
V2/CMS Tutorial/User Tools/Creating Content/Site/Add Site/Bespoke
From Senfi Docs
Contents
Add Site with Bespoke Model
Adding a Site using a Bespoke Model can be broken down into seven major steps:
- Create New Site
- Fill in General Information
- Choose Model Type
- Upload 3D Model
- Set Default View and Thumbnail
- Create BBL Structure
- Assigning 3D Objects to BBL
Note: Mandatory fields are marked with an ‘*’. The following steps assume that the user is already logged in to the CMS.
Create New Site

- Go to the
 Site tab.
 - Select
 ADD NEW. Go to Fill in General Information.
Fill in General Information
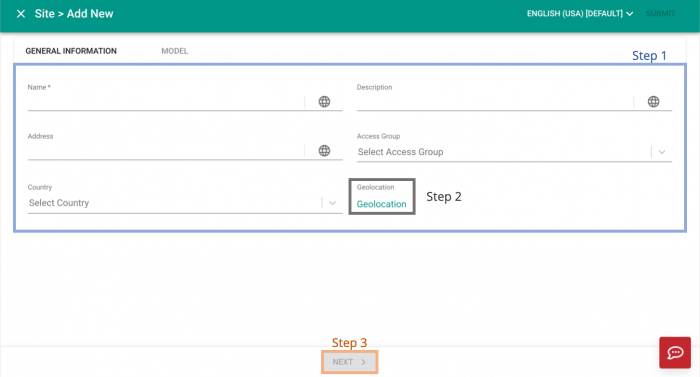
- Fill in the necessary fields (E.g. Site Name, Description, Country, Address etc.).
- Add Geolocation (optional):
- Select Geolocation.
- There are two ways to select location:
- Search:
- Use the
 Search function to look for the specific location.
- Drop Pin:
- Drag the map to the required location.
- Select "EDIT".
- Drop pin at the site location on the map.
- See Tip and Note (below).
- Select 'OK' to add geolocation. This will automatically update the country of the site but not its address.
- Select "NEXT". Go to Choose Model Type.
Tip: Subsequently, the pin can be dragged to different positions on the map.
Note: For subsequent changes, the displayed address will not be automatically updated. The  Use Address button must be selected to update the address.
Choose Model Type
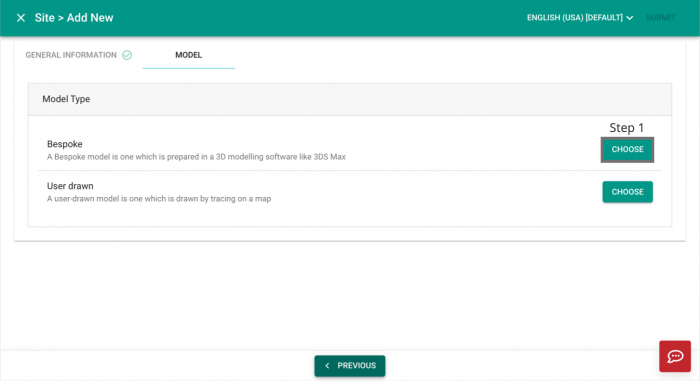
- Choose Bespoke model type.
- Go to Upload 3D Model.
Upload 3D Model
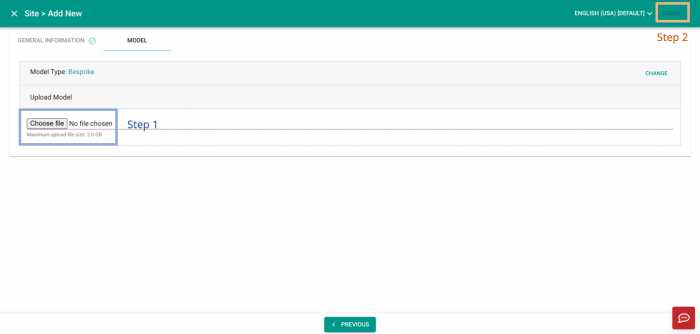
- Select "Choose file" to select and upload a 3D building model Zip File.
- Select SUBMIT (top right corner) to add the Site.
- Once the 3D model has been processed, further action will be prompted.
- Go to Set Default View and Thumbnail.

Set Default View and Thumbnail
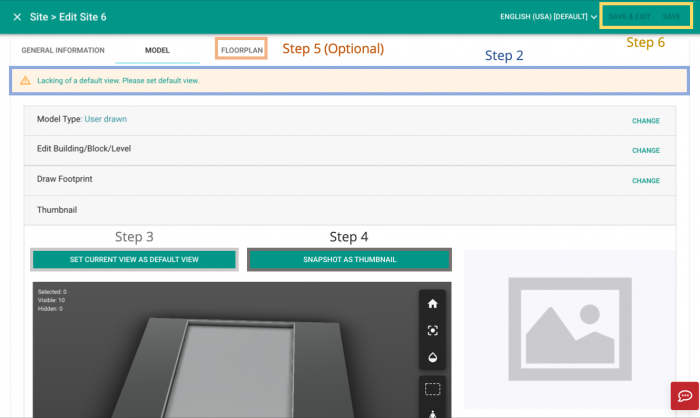
- Select
 Edit beside the site you just created.
 - Select the
 warning at the top of the screen.
 - Set the site’s default view.
- Set the site’s thumbnail (optional).
- Assign Objects to BBL (optional).
- Add 2D Floorplans for each level (optional).
- Select "SAVE" or "SAVE & EXIT" (top right corner).
Create BBL Structure

- Select Edit beside the site you just created.
- Select MODEL tab
- Select Edit Building/Block/Level
- A default building called Main Building has been created by the system. If you require more than one building, you can add more by clicking on ADD NEW BUILDING.
- To edit the building's name, just click on the building's name. After editing, click SAVE to update the building's name.
- To delete the building, just click on the
 DELETE button beside the building name.
 - To create the blocks under each building, just click on the
 NEXT arrow button beside the building name.
 - A default block called Main Block has been created by the system. If you require more than one block, you can add more by clicking on ADD NEW BLOCK.
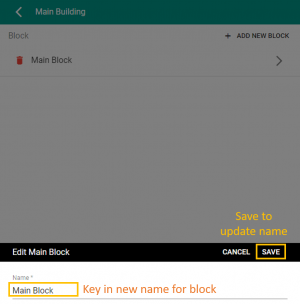
- To edit the block's name, just click on the block's name. After editing, click SAVE to update the block's name.
- To delete the block, just click on the DELETE button beside the block name.
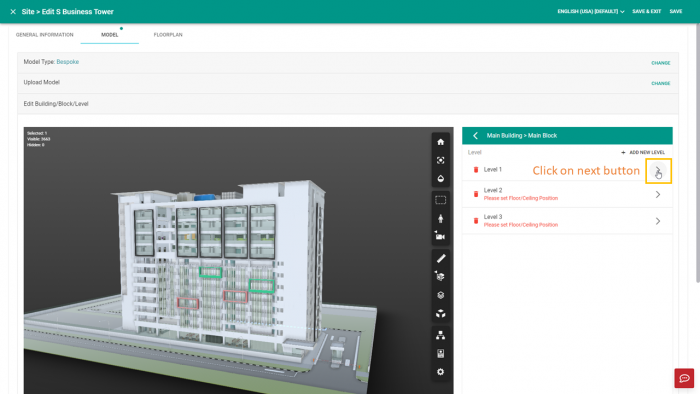
- To create the levels under each block, just click on the NEXT arrow button beside the block name.
- To return to the previous listing, click on the BACK arrow button beside the BBL breadcrumbs.

- Repeat steps 8 to 12 for every building in the BBL.
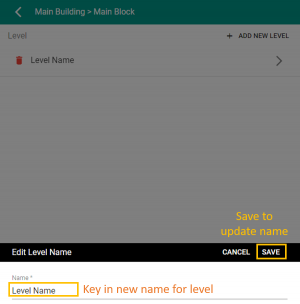
- A default level called Level Name has been created by the system. If you require more than one level, you can add more by clicking on ADD NEW LEVEL.
- To edit the level's name, just click on the level's name. After editing, click SAVE to update the level's name.
- To delete the level, just click on the DELETE button beside the level name.
- Repeat steps 14 to 16 for every block in the BBL.
- Select "SAVE" (top right corner) after you have finished creating the BBL structure.

Assigning 3D Objects to BBL
Now that we have created the BBL structure, we can proceed to assign objects to each building, block and level.
- To do so, go to the level listing in the BBL, and click on the NEXT arrow button beside the block name you want to assign objects to.
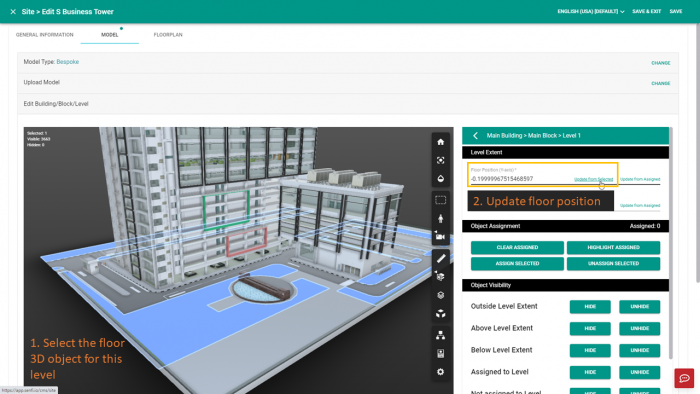
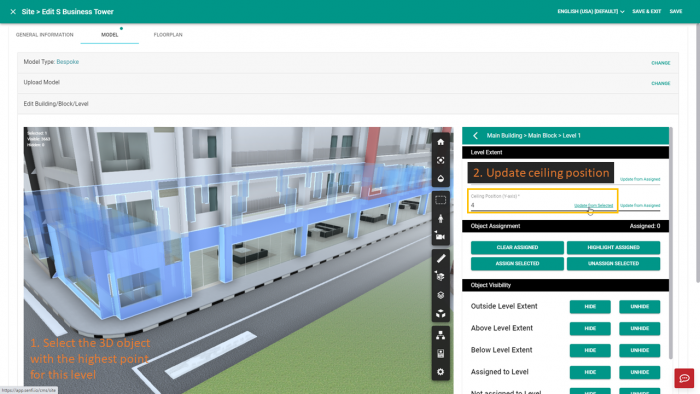
- First, you will need to define the level extent (vertical space where the level will extent to, from floor to ceiling). To do so, you can either:
- Fill in the floor position and ceiling position under the Level Extent section, if you have the information. Or,
- Select the floor 3D object for the level, and click on Update from Selected to update the floor position based on the selected 3D object's position. Repeat the same step for ceiling 3D object for the level.
- For levels with objects already assigned, you can also update the floor and ceiling position by selecting Update from Assigned.
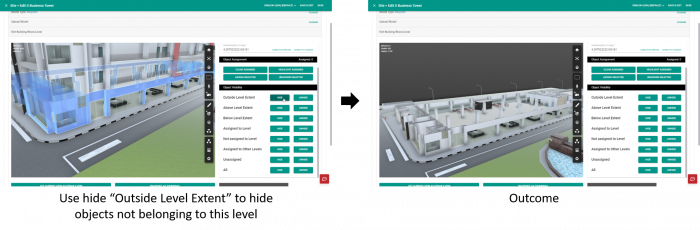
- Under the Object Visibility section, click on HIDE button beside Outside Level Extent to hide objects outside of the level extent.
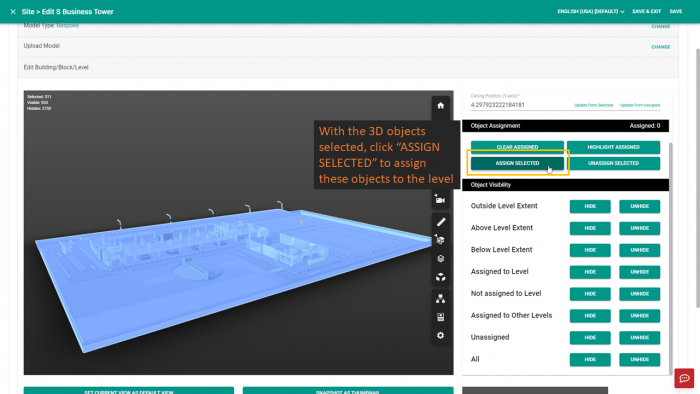
- Select all the objects belonging to this level extent. To select multiple 3D objects in the 3D scene, you can:
- Select one by one, by CTRL + Click on each object.
- Use the
 Select tool, and draw a rectangle encompassing the objects to be selected.
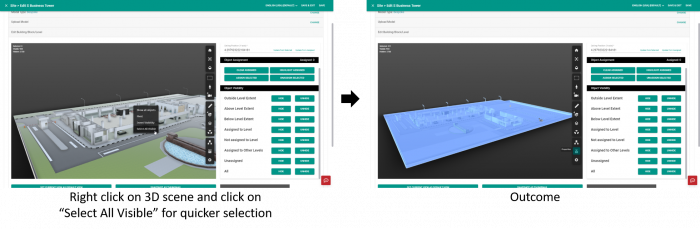
- Right click on 3D scene and click on Select All Visible for quicker selection.
- With the 3D objects selected, under the Object Assignment section, click ASSIGN SELECTED to assign these objects to the level.
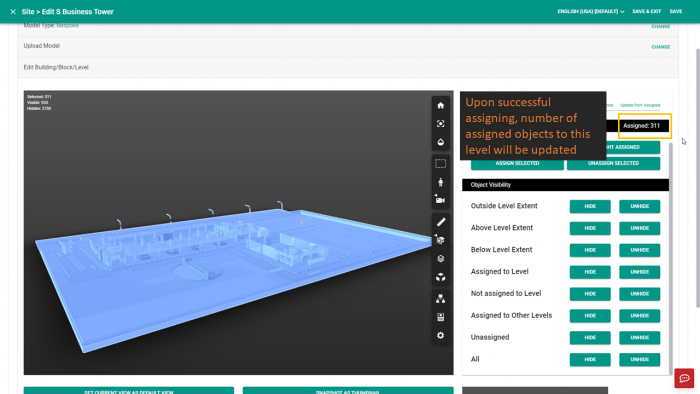
- Upon successful assigning of objects, the number of assigned objects to this level will be updated.
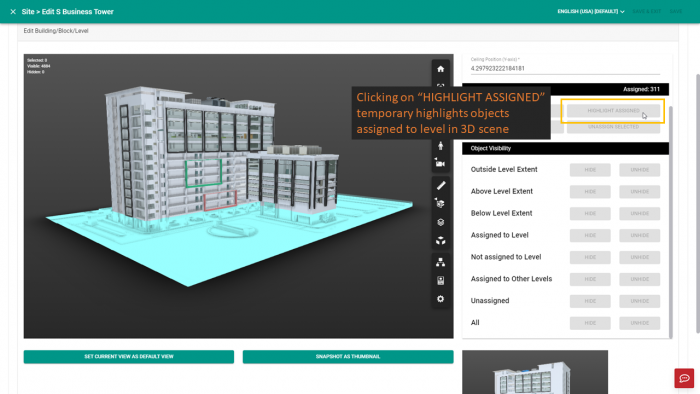
- You can use HIGHLIGHT ASSIGNED to temporary highlight and view the objects assigned to the level
- To remove all assigned objects from level, select CLEAR ASSIGNED button.
- To remove selected assigned objects from level, select the objects and click on UNASSIGN SELECTED button.
- Select "SAVE" (top right corner) after you have finished assigning the objects for this level.
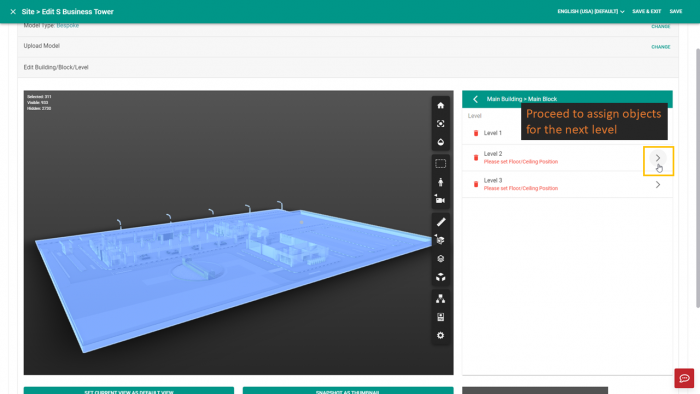
- Return to levels listing and continue with the rest of the building, blocks and level assignment.
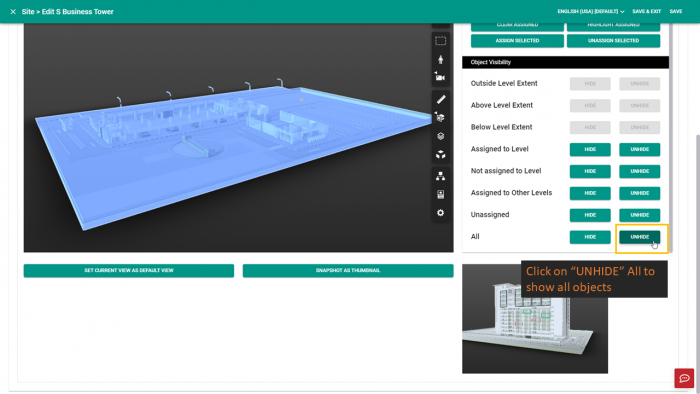
- If the objects are hidden, you can click on UNHIDE All to unhide all hidden objects
- You can use the options under the Object Visibility section to help you in showing or hiding 3D objects during objects selection.
- Outside Level Extent: Show or hide objects outside of level extent
- Above Level Extent: Show or hide objects above level extent
- Below Level Extent: Show or hide objects below level extent
- Assigned to Level: Show or hide objects already assigned to this level
- Not Assigned to Level: Show or hide objects not assigned to this level
- Assigned to Other Levels: Show or hide objects already assigned to other levels
- Unassigned: Show or hide objects not assigned to any levels
- All: Show or hide all 3D objects
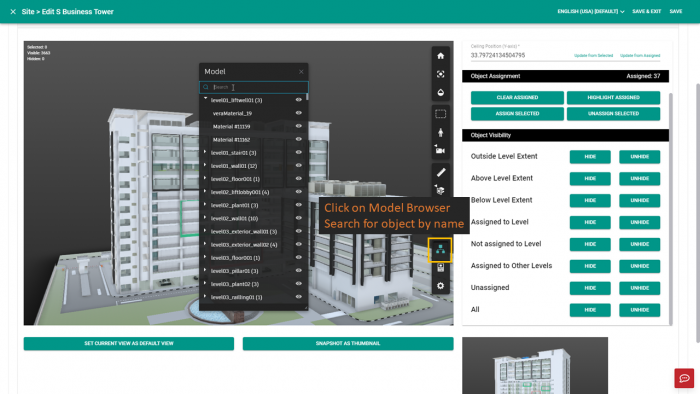
- Senfi CMS also provides Model Browser to allow you to search and select individual object by its name. In the toolbar, click on Model Browser to bring out the model object listing pop-up.
- Enter object name into the search bar. Objects with the relevant keywords will be filtered out.
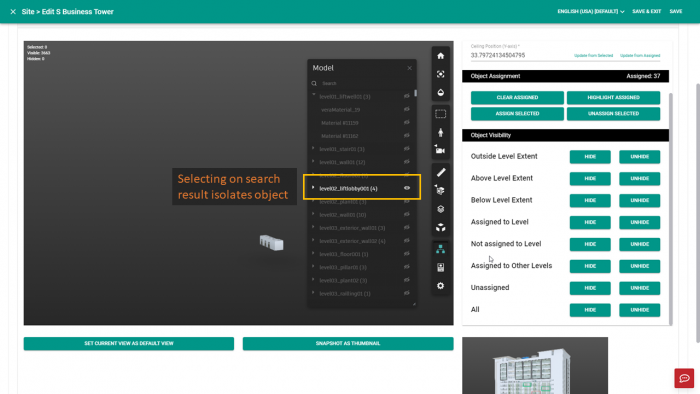
- Selecting on an item in the search result isolates the object
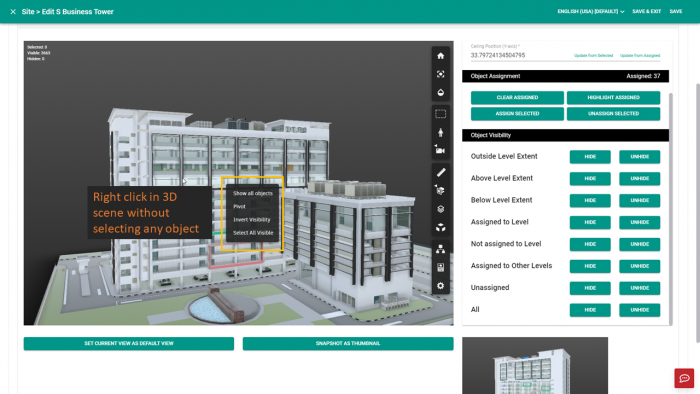
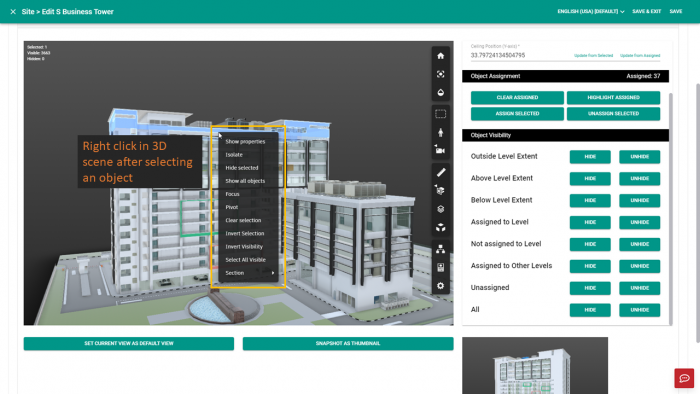
- Right clicking in the 3D scene without selecting any object brings up a menu with four options:
- Show all objects: Unhides all hidden objects.
- Pivot: Uses the point where the mouse click is as the pivot for all camera interactions (zoom/pan/rotate).
- Invert Visibility: Hides all visible objects and unhides all hidden objects.
- Select All Visible: Selects all visible objects.
- Right clicking in the 3D scene after selecting an object brings up a menu with eleven options:
- Show properties: Displays properties of selected object.
- Isolate: Isolates selected object.
- Hide selected: Hides selected object.
- Show all objects: Unhides all hidden objects.
- Focus: Zooms view into selected object.
- Pivot: Uses the selected object as the pivot for all camera interactions (zoom/pan/rotate).
- Clear selection: Clears all selection.
- Invert Selection: Unselects selected object and selects all unselected objects.
- Invert Visibility: Hides all visible objects and unhides all hidden objects.
- Select All Visible: Selects all visible objects.
-
Section: Isolate and section up the selected object according to the mode selected.
- Section Box: Uses a box to section the selected object.
- Section Plane: Uses a plane to section the selected object.

