V2/CMS Tutorial/User Tools/Creating Content/Asset/Asset/Annotation
From Senfi Docs
Contents
Add Asset Annotation
An annotation is used to add visual information to an asset. Senfi supports 4 types of annotation, namely:
- Line
- Volume
- 3D Text
- 2D Text
An asset can have more than one annotation.
Steps to Adding Line Annotation
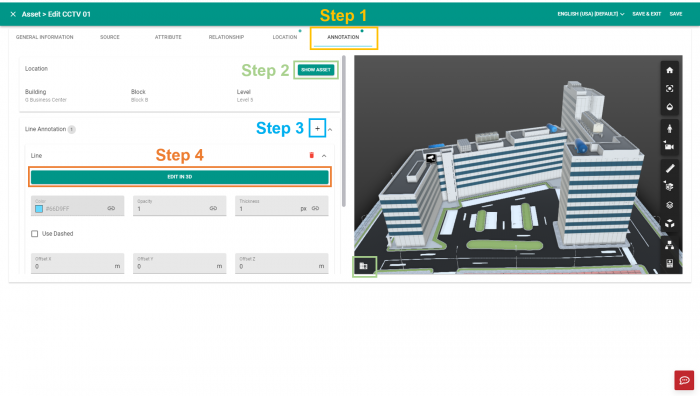
- Go to "Annotation" tab
- Click
 on the right of "Line Annotation"
 - Click "Edit in 3D" to start creating line
- Select
 to choose Building, Block and Level where the line annotation is to be placed on.
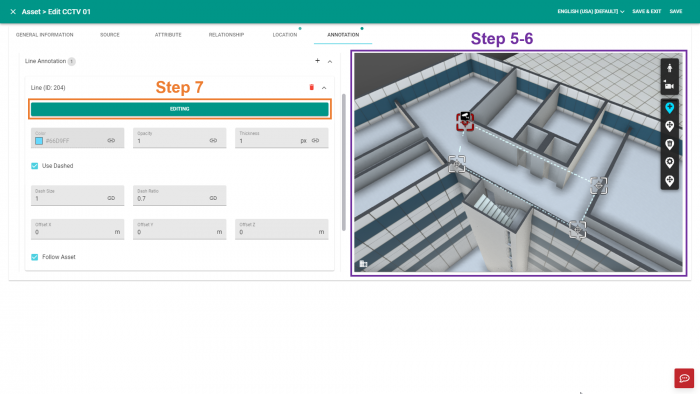
- Click on 3D view to create a vertex.
- You need to create at least 2 vertices before the line appears.
- Click "Editing" to finish creating line
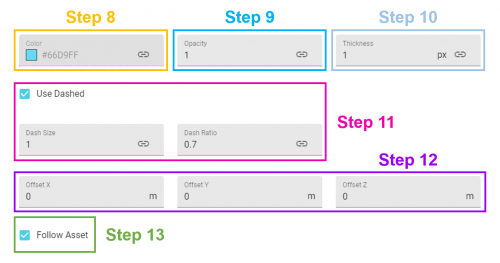
- Select a Color
- Set "Opacity" (value from 0 to 1)
- Set "Thickness"
- Check "Use Dashed" if you want a dashed line. If Dashed line is chosen, you can set the "Dash size" and "Dash ratio".
- Set "Offset X", "Offset Y" and/or "Offset Z" if offset of line annotation from original plotted position is required.
- The larger the Dash size, the longer the pattern.
- When Dash ratio is set to 0.05, the gap covers very little of the line.
- When Dash ratio is set to 1.0, the gap covers the whole line.
- Select "Follow Asset" if you require the line annotation to follow the asset as it moves.
- When "Follow Asset" is unchecked, you can pick a location for the line annotation in 3D.
- Click "Pick Location in 3D"
- Click on 3D view to selection new location.
Steps to Adding Volume Annotation
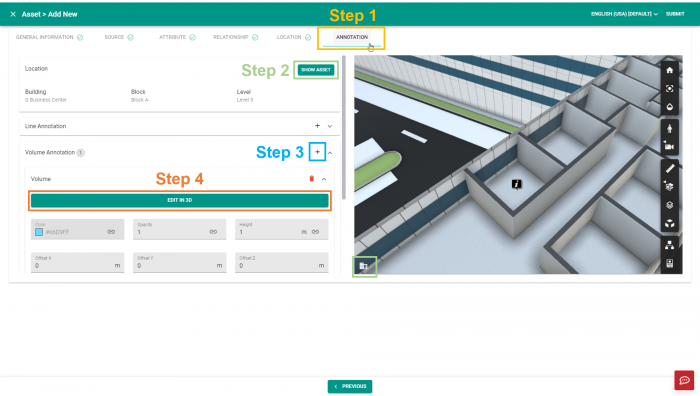
- Go to "Annotation" tab
- Click
 on the right of "Volume Annotation"
 - Click "Edit in 3D" to start creating volume
- Select
 to choose Building, Block and Level where the volume annotation is to be placed on.
- Click on 3D view on the right to create a vertex.
- You need to create at least 3 vertices before the volume appears.
- Click "Editing" to finish creating volume
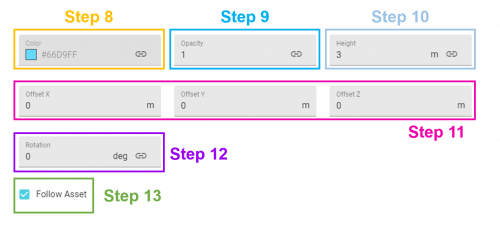
- Select a Color
- Set "Opacity" (value from 0 to 1)
- Set "Height"
- Set "Offset X", "Offset Y" and/or "Offset Z" if offset of volume annotation from original plotted position is required.
- Change "Rotation" to adjust volume orientation.
- Select "Follow Asset" if you require the volume annotation to follow the asset as it moves.
- When "Follow Asset" is unchecked, you can pick a location for the volume annotation in 3D.
- Click "Pick Location in 3D"
- Click on 3D view to selection new location.
Steps to Adding 3D Text Annotation
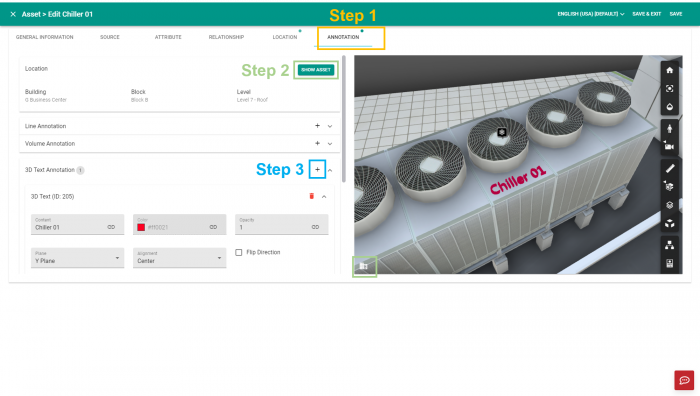
- Go to "Annotation" tab
- Click
 on the right of "3D Text Annotation"
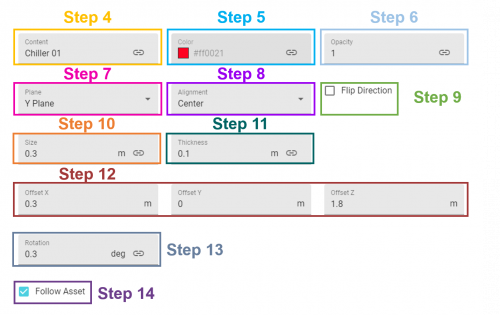
 - Select the "Plane" you want the text to be in.
- You can flip the direction of the text by checking "Flip Direction"
- Type a text in "Content"
- Increase "Size" until you can see the 3D text
- Select a color
- Set "Opacity"
- Set "Offset X", "Offset Y" and/or "Offset Z" if offset of 3D text annotation from original position is required.
- Change "Rotation" to adjust 3D text orientation
- Select "Follow Asset" if you require the 3D text annotation to follow the asset as it moves.
- When "Follow Asset" is unchecked, you can pick a location for the 3D text annotation in 3D.
- Click "Pick Location in 3D"
- Click on 3D view to selection new location.
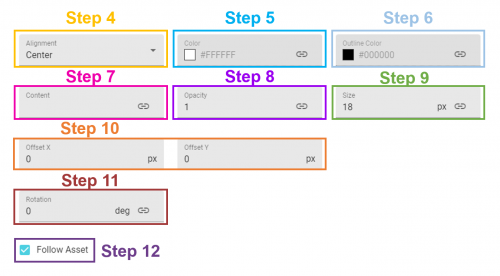
Steps to Adding 2D Text Annotation
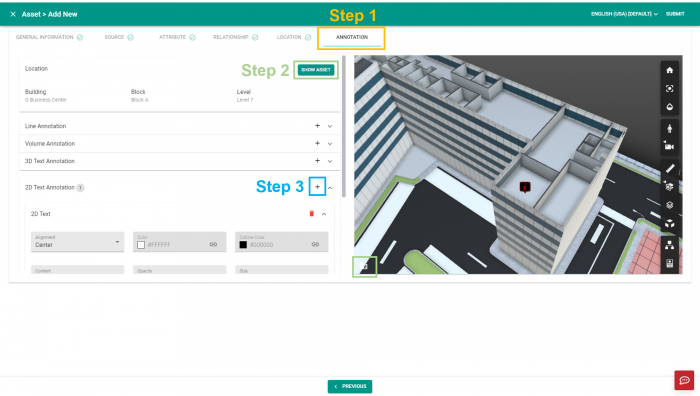
- Go to "Annotation" tab
- Click
 on the right of "3D Text Annotation"
 - Set "Alignment"
- Type a text in "Content"
- Select a color
- Set "Opacity"
- Set "Size"
- Set "Offset X" and/or "Offset Y" if offset of 2D text annotation from original position is required.
- Change "Rotation" to adjust 2D text orientation
- Select "Follow Asset" if you require the 2D text annotation to follow the asset as it moves.
- When "Follow Asset" is unchecked, you can pick a location for the 2D text annotation in 3D.
- Click "Pick Location in 3D"
- Click on 3D view to selection new location.

