
V2/CMS Tutorial/User Tools/Creating Content/Asset/Asset/Annotation
Contents
Add Asset Annotation
An annotation is used to add visual information to an asset. Senfi supports 4 types of annotation, namely:
- Line
- Volume
- 3D Text
- 2D Text
An asset can have more than one annotation.
Steps to Adding Line Annotation
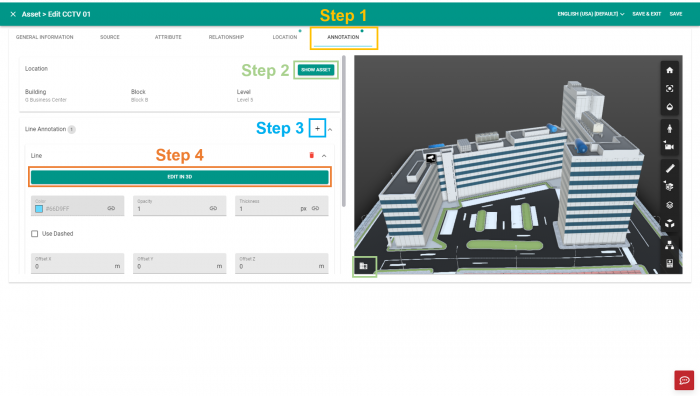
- Go to "Annotation" tab.
- Click on "Show Asset" if you wish to place the line annotation at where the asset is located. This will help hide the 3D model above the asset's location. Else you can select
 to choose Building, Block and Level where the line annotation is to be placed on.
 - Click
 on the right of "Line Annotation".
 - Click "Edit in 3D" to start creating line.
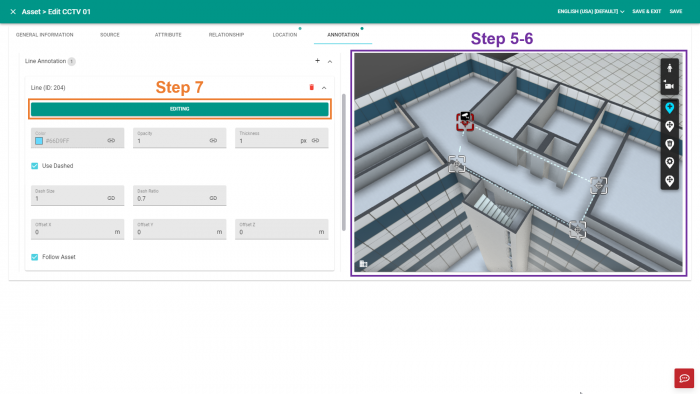
- Click on 3D view to create a vertex.
- Click
 to go into first person view.
 - Click
 to change camera interactions.
- Click
 to fit to view.
 - Click
 to change camera's focal length.
 - Click
 to change camera roll.
- Click
- Click
 to add a point.
 - Click
 to select and/or move a point.
 - Click
 to delete a point.
 - Click
 to change line edit settings.
 - Click
 to configure translate settings.
- Click
- You need to create at least 2 vertices before the line appears.
- Click "Editing" to finish creating line.
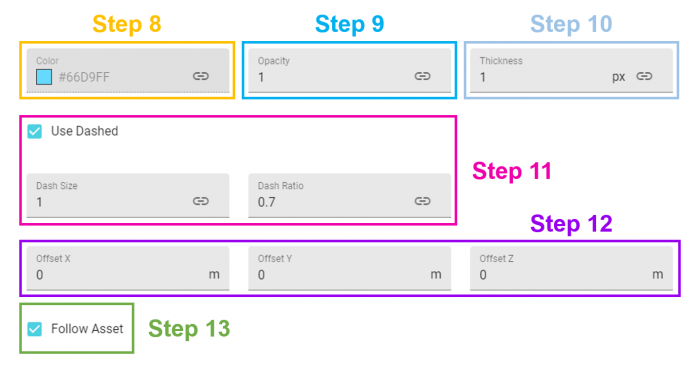
- Select a Color.
- Set "Opacity" (value from 0 to 1).
- Set "Thickness".
- Check "Use Dashed" if you want a dashed line. If Dashed line is chosen, you can set the "Dash size" and "Dash ratio".
- Set "Offset X", "Offset Y" and/or "Offset Z" if offset of line annotation from original plotted position is required.
- The larger the Dash size, the longer the pattern.
- When Dash ratio is set to 0.05, the gap covers very little of the line.
- When Dash ratio is set to 1.0, the gap covers the whole line.
- Select "Follow Asset" if you require the line annotation to follow the asset as it moves.
- For properties with the
 button, you will be able to add dynamic content to the selected property instead of static content. View "Adding Annotations with Dynamic Content" for more information on how to add dynamic content.
Steps to Adding Volume Annotation
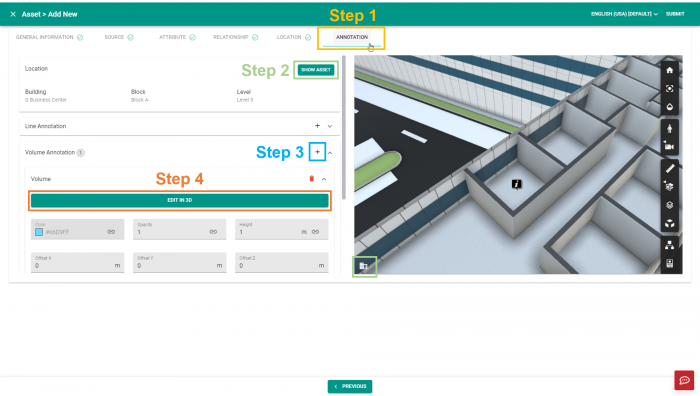
- Go to "Annotation" tab.
- Click on "Show Asset" if you wish to place the volume annotation at where the asset is located. This will help hide the 3D model above the asset's location. Else you can select to choose Building, Block and Level where the volume annotation is to be placed on.
- Click on the right of "Volume Annotation".
- Click "Edit in 3D" to start creating volume.
- Click on 3D view on the right to create a vertex.
- Click to go into first person view.
- Click to change camera interactions.
- Click to fit to view.
- Click to change camera's focal length.
- Click to change camera roll.
- Click
- Click to add a point.
- Click to select and/or move a point.
- Click to delete a point.
- Click to change line edit settings.
- Click to configure translate settings.
- Click
- You need to create at least 3 vertices before the volume appears.
- Click "Editing" to finish creating volume.
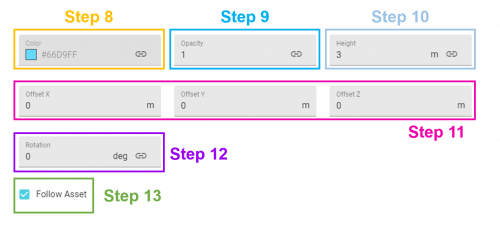
- Select a Color.
- Set "Opacity" (value from 0 to 1).
- Set "Height".
- Set "Offset X", "Offset Y" and/or "Offset Z" if offset of volume annotation from original plotted position is required.
- Change "Rotation" to adjust volume orientation.
- Select "Follow Asset" if you require the volume annotation to follow the asset as it moves.
- For properties with the button, you will be able to add dynamic content to the selected property instead of static content. View "Adding Annotations with Dynamic Content" for more information on how to add dynamic content.

Steps to Adding 3D Text Annotation
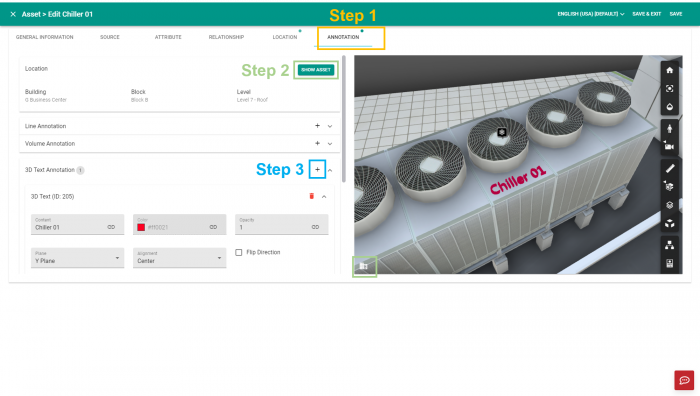
- Go to "Annotation" tab.
- Click on "Show Asset" if you wish to place the 3D text annotation at where the asset is located. This will help hide the 3D model above the asset's location. Else you can select to choose Building, Block and Level where the 3D text annotation is to be placed on.
- Click on the right of "3D Text Annotation".
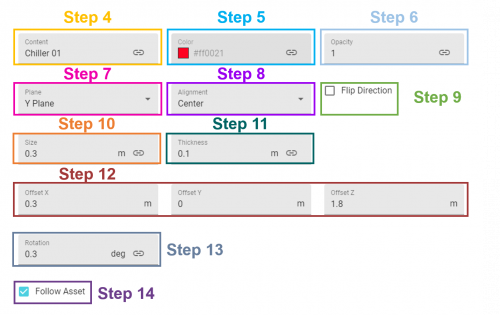
- Type text in "Content".
- Select a color.
- Set "Opacity" (value from 0 to 1).
- Select the "Plane" you want the text to be in.
- Set "Alignment".
- You can flip the direction of the text by checking "Flip Direction".
- Adjust "Size" till desired.
- Adjust "Thickness" till desired.
- Set "Offset X", "Offset Y" and/or "Offset Z" if offset of 3D text annotation from original position is required.
- Change "Rotation" to adjust 3D text orientation.
- Select "Follow Asset" if you require the 3D text annotation to follow the asset as it moves.
- For properties with the button, you will be able to add dynamic content to the selected property instead of static content. View "Adding Annotations with Dynamic Content" for more information on how to add dynamic content.
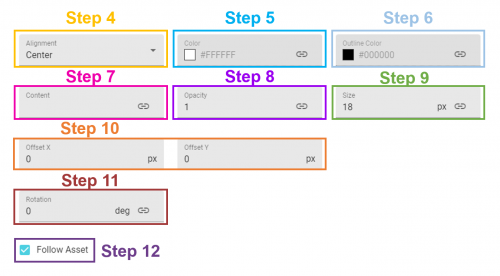
Steps to Adding 2D Text Annotation
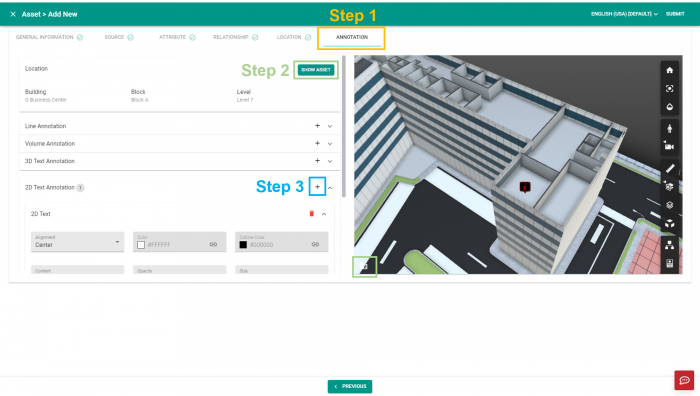
- Go to "Annotation" tab.
- Click on "Show Asset" if you wish to place the 2D text annotation at where the asset is located. This will help hide the 3D model above the asset's location. Else you can select to choose Building, Block and Level where the 2D text annotation is to be placed on.
- Click on the right of "2D Text Annotation".
- Set "Alignment".
- Select a color.
- Select text outline color.
- Type a text in "Content".
- Set "Opacity" (value from 0 to 1).
- Set "Size".
- Set "Offset X" and/or "Offset Y" if offset of 2D text annotation from original position is required.
- Change "Rotation" to adjust 2D text orientation.
- Select "Follow Asset" if you require the 2D text annotation to follow the asset as it moves.
- For properties with the button, you will be able to add dynamic content to the selected property instead of static content. View "Adding Annotations with Dynamic Content" for more information on how to add dynamic content.
Adding Annotations with Dynamic Content
The annotation's properties can be set dynamically, e.g. change in color of volume according to asset's temperature variation. To do so, click on the ![]() button in the property field.
button in the property field.
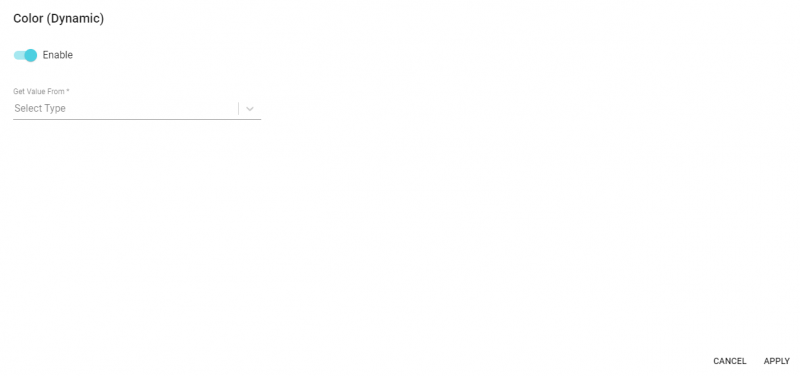
A dialog box will appear to allow you to set the dynamic content. To do so, you will need to select the source where the annotation property will get it's value from. Annotation properties can be set dynamically from the value of:
- Asset Property (Available for 2D and 3D text annotation content)
- Asset Name
- Asset Description
- Asset Coordinate
- Asset Attribute (Available if asset possess attribute data)
- Metric Data (Available if asset possess metric data)
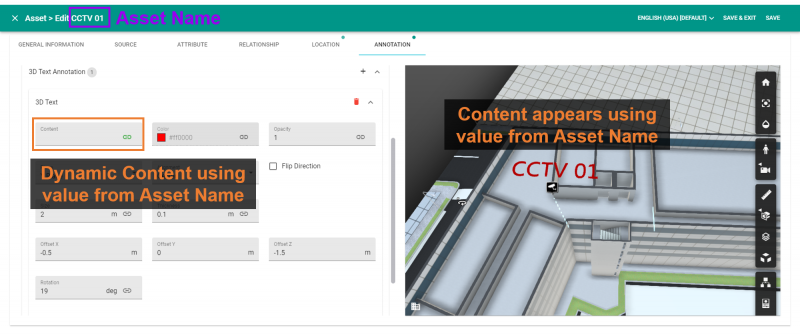
Using value from Asset Property
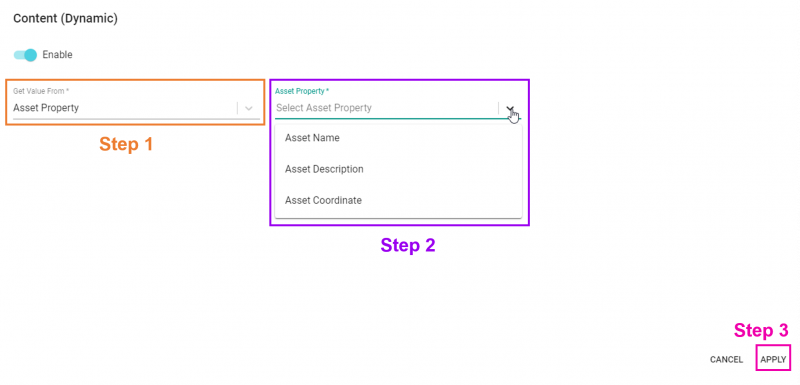
For 2D and 3D text annotation content property, the content value can be dynamically retrieved from the asset's name, description or coordinate. To do so,
- Select "Get value from" Asset Property
- Select Asset Property (Name/Description/Coordinate)
- Click "Apply" to save all settings
Using value from Asset Attribute
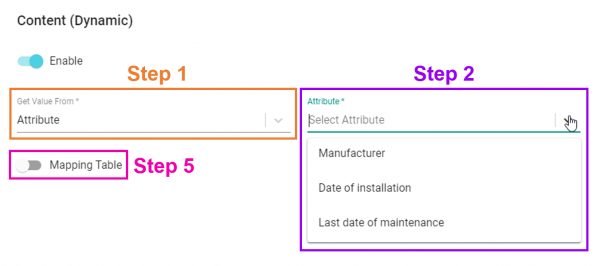
For all annotation properties that allows dynamic content, the property value can be dynamically retrieved from the asset's attribute(s) if attribute data is available. To do so,
- Select "Get value from" Asset Attribute.
- Select Asset Attribute from list (Attribute list varies according to available data).
- It is optional to have a mapping table. If mapping table is not enabled after an asset's attribute is chosen, the attribute's value will directly be applied as the property's value.
- A mapping table is compulsory if the asset attribute's data type (string) does not match the property's data type.
- To enable Mapping Table, toggle on Mapping Table switch

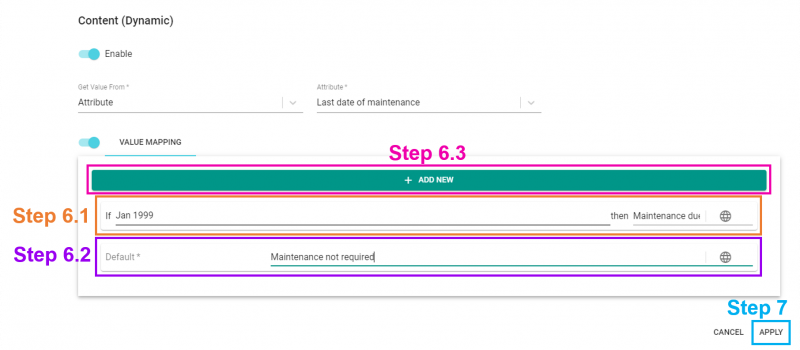
- Perform value mapping by:
- Mapping each attribute value to property's value.
- Providing default property's value (to be used when attribute value do not match any of the values stated in the mapping table).
- Adding additional value mappings (as needed) by clicking on the "Add New" button.
- Click "Apply" to save all settings.
Using value from Metric
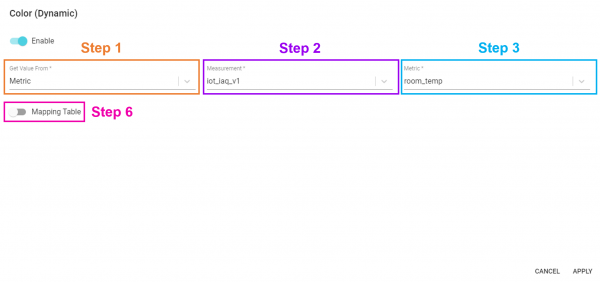
For all annotation properties that allows dynamic content, the property value can be dynamically retrieved from the asset's metric(s) if metric data is available. To do so,
- Select "Get value from" Metric.
- Select Measurement from list (Measurement list varies according to available data).
- Select Metric from list (Metric list varies according to available data).
- It is optional to have a mapping table. If mapping table is not enabled after a metric is chosen, the metric's value will directly be applied as the property's value.
- A mapping table is compulsory if the metric's data type does not match the property's data type.
- To enable Mapping Table, toggle on Mapping Table switch
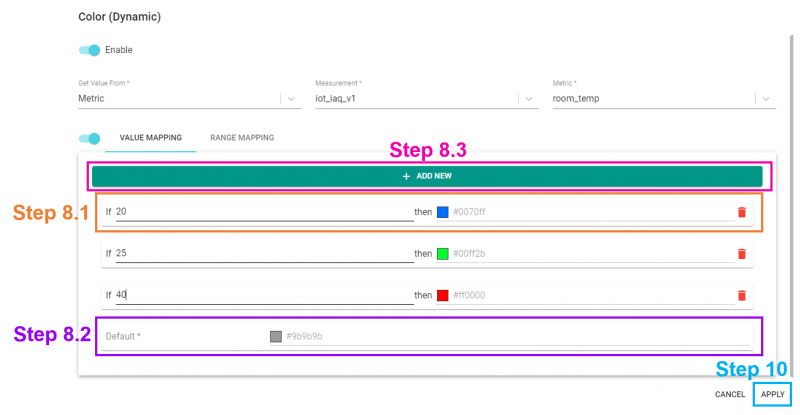
- There are two types of mapping table available (choose either one):
- Value Mapping: Maps a specific metric value to a property value.
- Range Mapping: Maps a range of metric values to a property value.
- Perform value mapping by:
- Mapping each metric value to property's value.
- Providing default property's value (to be used when metric value does not match any of the values stated in the mapping table).
- Adding additional value mappings (as needed) by clicking on the "Add New" button.
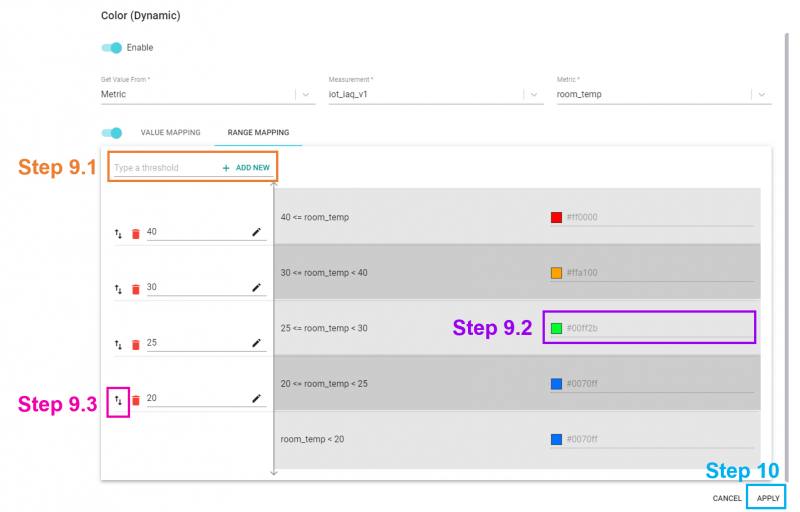
- Perform range mapping by:
- Adding a threshold.
- Providing property's value to be used for each range.
- Using swap button
 to change notations used for the range (<, <=, >, >=).
 - Repeating steps 9.1 to 9.3 as necessary.
- Click "Apply" to save all settings.
Acceptable values & default values for annotation's properties
Following are the acceptable values and default values for annotation's properties.
| Property | Value Type | Value Range | Default Value |
|---|---|---|---|
| color | string | #000000 to #ffffff | #ffffff (2D Text, 3D Text); #000000 (Line, Volume) |
| outline_color | string | #000000 to #ffffff | #000000 |
| opacity, dash_ratio | float | 0.0 to 1.0 | 1.0 (opacity), 0.5 (dash_ratio) |
| thickness, height, size | float | 0.0 to Infinity | 18 (2D Text size); 1.0 (everything else) |
| dash_size | float | 0.0 to Infinity | 0.05 |
| rotation | float | -Infinity to Infinity | 0.0 |
| content | string | N.A. | "" |