
Difference between revisions of "V2/Integrate/XProtect Video"
| (28 intermediate revisions by the same user not shown) | |||
| Line 59: | Line 59: | ||
# Server/Gateway Hostname - This should be app.senfi.io | # Server/Gateway Hostname - This should be app.senfi.io | ||
# Login via your Senfi API Key and associated secret pair. | # Login via your Senfi API Key and associated secret pair. | ||
| + | # If you require proxy, please send us an [mailto:contact@senfi.io email] with your organization name and contact details for further instructions. | ||
| + | |||
==== '''Setup Page''' ==== | ==== '''Setup Page''' ==== | ||
| − | This page is used to register the Senfi | + | This page is used to register the Senfi XProtect Video Adapter with Senfi. |
Fill in: | Fill in: | ||
| Line 69: | Line 71: | ||
# Secret - Secret to your Senfi API Key | # Secret - Secret to your Senfi API Key | ||
| − | After registration, you will see a Video Adapter ID. The ID and Video Adapter Name will be shown in the [https://app.senfi.io/cms/video_adapter | + | After registration, you will see a Video Adapter ID. The ID and Video Adapter Name will be shown in the [https://app.senfi.io/cms/video_adapter Senfi CMS Video page] when you use the CMS to configure site/asset to video stream. |
[[File:Msva_02_setup.png|thumb|center|800px|Setup Page|link=]] | [[File:Msva_02_setup.png|thumb|center|800px|Setup Page|link=]] | ||
| − | Click '''Setup | + | Click '''Setup XProtect''' to continue. |
| − | ==== ''' | + | ==== '''XProtect Config''' ==== |
This page is used to configure the connection to the Milestone XProtect server | This page is used to configure the connection to the Milestone XProtect server | ||
| − | [[File: | + | [[File:XProtect_Config.png|thumb|center|716px|Configure XProtect|link=]] |
Fill in: | Fill in: | ||
| − | # | + | # XProtect Management Server hostname or IP address |
| − | # | + | # XProtect Server port - 80 (Default) |
| − | # | + | # XProtect Account Username - Username of an account on XProtect with required Roles<span style="color:red">*</span> |
| − | # | + | # XProtect Account Password - Password to above |
| − | # | + | # XProtect Account Domain (Optional) - Fill this in if your XProtect account is a domain LDAP account |
# Credential Type - Windows or Basic Account | # Credential Type - Windows or Basic Account | ||
| − | # | + | # Management Server Encrypted – If XProtect server has SSL enabled (e.g. using https), select “Yes” |
| − | # | + | # Event Server Encrypted – If XProtect server has SSL enabled (e.g. using https), select “Yes” |
| − | # | + | # XProtect Adapter hostname or IP address - localhost (Default/Cannot be modified) |
| + | # XProtect Adapter port - 8732 (Default/Cannot be modified) | ||
| + | # XProtect Adapter Streaming Base Port - 49152 (Default) | ||
| + | |||
| + | <span style="color:red">*</span> The following Role permissions on XProtect are required: | ||
| + | * Management Server - Connect | ||
| + | * Cameras - Read, View live, Playback, Read Sequences, Manual PTZ | ||
| + | * Input - Read | ||
| + | * Alarms - Manage, View, Receive Notifications | ||
| + | * Alarm Definitions - View | ||
| − | Click "Update Configuration" to set or change the configuration. If successful, the page will show "Connected to | + | Click "Update Configuration" to set or change the configuration. If successful, the page will show "Connected to XProtect Server: <IP/Hostname>". |
==== '''Video''' ==== | ==== '''Video''' ==== | ||
| − | The Video page is used to configure live video from | + | The Video page is used to configure live video from XProtect that will be available for streaming to Senfi. |
| − | |||
| − | |||
To add a new Stream | To add a new Stream | ||
| − | # Click "Stream +". The Stream > Add New page will appear | + | [[File:Add_Video_Stream_01_labelled.png|thumb|center|781px|Add new stream|link=]] |
| − | # Specify [[File: | + | # Go to the "Video" tab. |
| + | # Click "Stream +". The Stream > Add New page will appear. | ||
| + | # Specify [[File:Add_Video_Stream_02.png|thumb|center|800px|Add new stream page|link=]] | ||
#* Stream Name | #* Stream Name | ||
| − | #* Select from the list of cameras in the | + | #* Stream Type (XProtect) |
| + | #* Select from the list of cameras in the XProtect server | ||
#* If the selected camera has PTZ capability, you can check the "PTZ" checkbox to enable PTZ capability in Senfi | #* If the selected camera has PTZ capability, you can check the "PTZ" checkbox to enable PTZ capability in Senfi | ||
# Preview stream by selecting "PREVIEW" beside "Source URL" (Optional). | # Preview stream by selecting "PREVIEW" beside "Source URL" (Optional). | ||
| Line 111: | Line 123: | ||
==== '''Alarm''' ==== | ==== '''Alarm''' ==== | ||
| − | The Alarm page is used to configure | + | The Alarm page is used to configure XProtect alarms which will be raised as Senfi External Events. Following is the pipeline of how XProtect alarms will be raised as Senfi External Events: |
| − | # Something happens to/in a | + | # Something happens to/in a XProtect device |
| − | # An alarm is raised by | + | # An alarm is raised by XProtect |
| − | # Senfi | + | # Senfi XProtect Video Adapter is notified |
| − | # If an External Event has been configured for the | + | # If an External Event has been configured for the XProtect Alarm and alarm state combination, and that External Event has been selected as raisable for the XProtect device, a Senfi External Event is generated by Senfi XProtect Video Adapter. |
# If the External Event (assuming that the External Event is linked to a Senfi Asset in the CMS) has been configured to raise a Senfi Alarm, a Senfi Alarm is raised. | # If the External Event (assuming that the External Event is linked to a Senfi Asset in the CMS) has been configured to raise a Senfi Alarm, a Senfi Alarm is raised. | ||
| Line 122: | Line 134: | ||
The Alarm page is split into 2 tabs: | The Alarm page is split into 2 tabs: | ||
| − | # Alarm - To configure | + | # Alarm - To configure XProtect Alarm/Alarm state combination mapping to Senfi external event (i.e. which external event to be sent) |
| − | # Device - To configure | + | # Device - To configure XProtect device mapping to Senfi external event (i.e. which XProtect devices can send which external events) |
| − | ==== | + | ==== XProtect Alarm Tab ==== |
| − | + | In this tab, a list of XProtect alarm definitions configured on the XProtect Server are shown. | |
| − | |||
| − | In this tab, a list of | ||
To forward an alarm/state combination to Senfi as an external event: | To forward an alarm/state combination to Senfi as an external event: | ||
| − | # Click the Pencil icon on the desired | + | # Click the Pencil icon on the desired XProtect alarm [[File:Alarm_configuration_01.png|thumb|center|800px|XProtect Alarm Page|link=]] |
| − | # In Senfi Event Raised, select | + | # In Senfi Event Raised, select '''+ EVENT FOR INCOMING ALARM''' - 1 Senfi event will be added to be generated when a New alarm is received by the adapter. [[File:Alarm_configuration_02.png|thumb|center|800px|XProtect Alarm to Senfi Event Mapping|link=]] |
| − | + | # Fill in '''Name''' - Name of external event in Senfi [[File:Alarm_configuration_04.png|thumb|center|800px|Name of external event to be displayed in Senfi|link=]] | |
| − | # | + | # A standard input and description has been auto-filled to be displayed in the eventual alarm in Senfi. To modify, change in Advanced section: |
| − | + | #* Inputs - Select from list of XProtect alarm data you want to use for inputs in the eventual Senfi alarm's description | |
| − | + | #* Description - Description of the eventual Senfi alarm, with embedded per-alarm-instance inputs [[File:Alarm_configuration_05.png|thumb|center|800px|Advanced settings|link=]] | |
| − | |||
| − | # | ||
| − | # | ||
| − | # | ||
# Click SAVE & EXIT | # Click SAVE & EXIT | ||
| − | + | This tab only configures XProtect Alarm/State combo to Senfi External Event mapping. Once configured, the equivalent External Event will automatically be created in Senfi CMS. To associate Senfi External Event from a particular XProtect device to be sent to Senfi, go to the XProtect Device tab. | |
| − | + | Note: | |
| + | Only '''New''' XProtect Alarm State will generate a Senfi event. Other XProtect Alarm States will update an existing Senfi event. | ||
| − | ==== | + | ==== XProtect Device Tab ==== |
| − | In this tab, a list of | + | In this tab, a list of XProtect camera and input devices configured on the XProtect Server are shown. |
| − | [[File: | + | [[File:Device_Configuration_01.png|thumb|center|779px|XProtect Device Page|link=]] |
| − | To map mapped alarms (configured in the | + | To map mapped alarms (configured in the XProtect Alarm Tab) from XProtect devices to Senfi assets: |
| − | # Click the Pencil icon on the desired | + | # Click the Pencil icon on the desired XProtect device |
| − | # Write down the source_id for the corresponding | + | # Write down the source_id for the corresponding XProtect Device. You will need this information later when configuring Senfi assets in the CMS. |
| − | # In Senfi Event Triggered, select one or more mapped Senfi External Event that this | + | # In Senfi Event Triggered, select one or more mapped Senfi External Event that this XProtect device will trigger in Senfi. |
# Click SAVE & EXIT | # Click SAVE & EXIT | ||
| − | [[File: | + | [[File:Device_Configuration_02.png|thumb|center|726px|Sample of XProtect Device to Senfi Event Mapping|link=]] |
| − | Note: In Step 3, all Senfi External Event mapped by this adapter will be shown. This may include events that cannot be raised by the selected | + | Note: In Step 3, all Senfi External Event mapped by this adapter will be shown. This may include events that cannot be raised by the selected XProtect Device (e.g. a Camera raising an input triggered external event mapped to a XProtect input alarm) |
==== '''Backup & Restore''' ==== | ==== '''Backup & Restore''' ==== | ||
| − | [[File:Msva_11_Backup.png|thumb|center| | + | [[File:Msva_11_Backup.png|thumb|center|800px|Backup|link=]] |
To backup configuration, click BACKUP | To backup configuration, click BACKUP | ||
| − | [[File:Msva_12_Restore.png|thumb|center| | + | [[File:Msva_12_Restore.png|thumb|center|800px|Restore|link=]] |
To restore from previously downloaded backup config file, click RESTORE | To restore from previously downloaded backup config file, click RESTORE | ||
| − | [[File:Msva_13_ResetToFactoryDefault.png|thumb|center| | + | [[File:Msva_13_ResetToFactoryDefault.png|thumb|center|800px|Reset to factory default|link=]] |
To remove all streams and reset settings to factory default, click RESET TO FACTORY DEFAULT | To remove all streams and reset settings to factory default, click RESET TO FACTORY DEFAULT | ||
| − | ===Steps to Use Configured | + | ===Steps to Use Configured XProtect Video and External Events in Senfi CMS=== |
To use the configured video and external events in Senfi, additional configuration needs to be performed in the Senfi CMS. | To use the configured video and external events in Senfi, additional configuration needs to be performed in the Senfi CMS. | ||
==== '''Associate Video Adapter to Site in CMS''' ==== | ==== '''Associate Video Adapter to Site in CMS''' ==== | ||
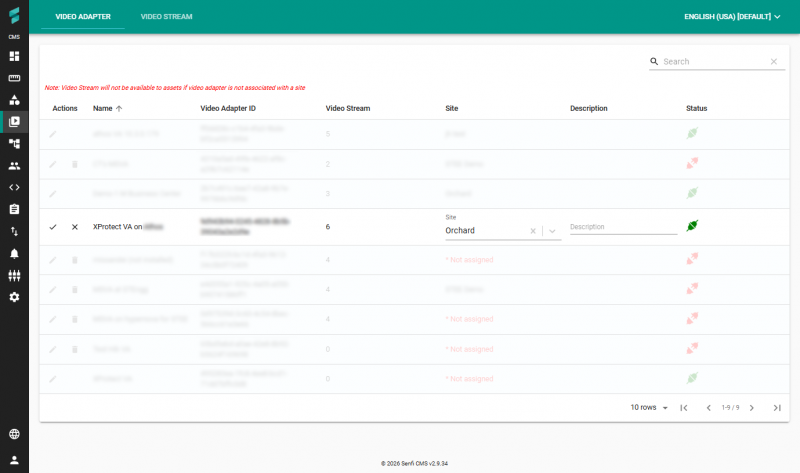
# Go to the [https://app.senfi.io/cms/video_adapter Video Page] | # Go to the [https://app.senfi.io/cms/video_adapter Video Page] | ||
| − | # In the VIDEO ADAPTER tab, find the Name (or Video Adapter ID) of the Senfi | + | # In the VIDEO ADAPTER tab, find the Name (or Video Adapter ID) of the Senfi XProtect Video Adapter, and click the Pencil icon [[File:Video_adapter.png|thumb|center|800px|Video adapters page|link=]] |
# Select the Site to associate this video adapter with | # Select the Site to associate this video adapter with | ||
# Optionally, provide a description | # Optionally, provide a description | ||
| − | # Click the Tick arrow to save. | + | # Click the Tick arrow to save. [[File:Video_adapter_02.png|thumb|center|800px|Video adapters page|link=]] |
==== '''Link Video Streams to Asset in CMS''' ==== | ==== '''Link Video Streams to Asset in CMS''' ==== | ||
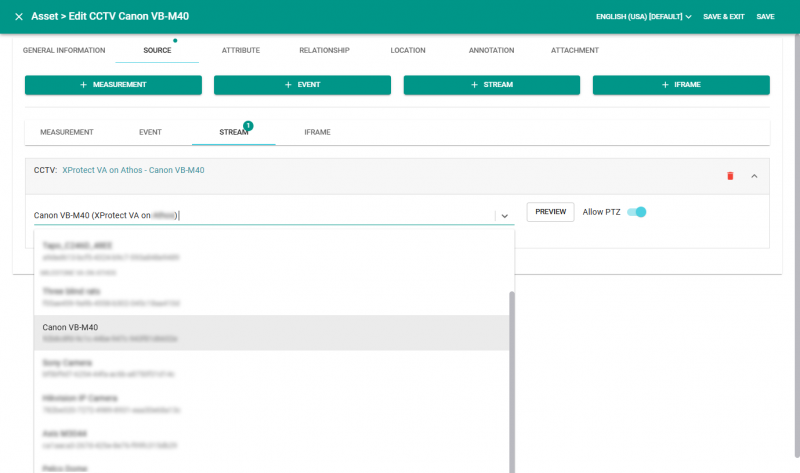
# Edit the Asset | # Edit the Asset | ||
# Click + STREAM | # Click + STREAM | ||
| − | # Select the | + | # Select the XProtect video camera in the drop down list |
# Select whether to Allow PTZ if PTZ has been enabled. | # Select whether to Allow PTZ if PTZ has been enabled. | ||
# Preview stream by selecting "PREVIEW" beside "Source URL" (Optional). | # Preview stream by selecting "PREVIEW" beside "Source URL" (Optional). | ||
| − | # Click SAVE & EXIT | + | # Click SAVE & EXIT [[File:Configure_video.png|thumb|center|800px|Link video stream to asset in CMS|link=]] |
==== '''Link External Event to Asset in CMS''' ==== | ==== '''Link External Event to Asset in CMS''' ==== | ||
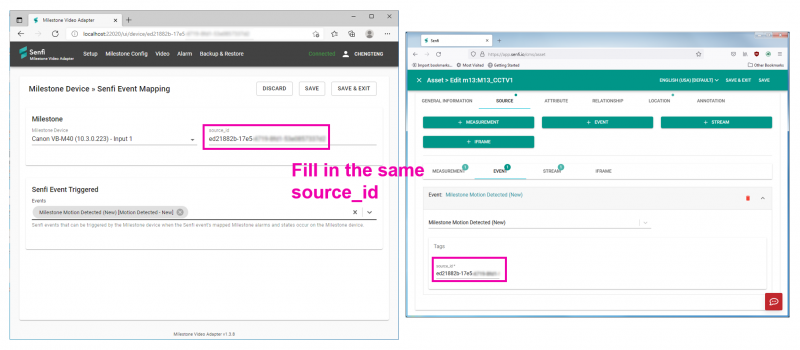
| − | For External Events generated by Senfi | + | For External Events generated by Senfi XProtect Video Adapter to be attributed to a Senfi Asset, the Senfi Asset must be configured with an External Event source, with the source_id you written down in the "XProtect Device Tab" section Step 2. |
# Edit the Asset | # Edit the Asset | ||
# Click + EVENT | # Click + EVENT | ||
# Select the External Event in the drop down list | # Select the External Event in the drop down list | ||
| − | # User Tags, enter the source_id of the | + | # User Tags, enter the source_id of the XProtect device. This is the source_id you have written earlier in "XProtect Device Tab" Step 2 [[File:Linking_source_id.png|thumb|center|800px|Fill in the same source_id|link=]] |
# Click SAVE & EXIT | # Click SAVE & EXIT | ||
| + | |||
| + | ==== '''Raising External Alarms in CMS''' ==== | ||
| + | By setting up and linking an external event to an asset does not mean that alarms from external systems will be directly raised in Senfi. All external alarms must be raised by proxy using external events, which then trigger Senfi alarms using Senfi's automation workflow. | ||
| + | |||
| + | # Follow [[V2/CMS_Tutorial/User_Tools/Creating_Content/Automation/Alarm|Add Alarm]] to add Alarm. | ||
| + | # Select external event as event trigger [[File:External_Alarm.png|thumb|center|800px|Adding alarm for external event|link=]] | ||
Latest revision as of 17:14, 4 May 2026
Contents
Senfi XProtect Video Adapter
The Senfi XProtect Video Adapter is available to onboarded partners only. If you would like to join as a Senfi partner, please send us an email with your organization name and contact details.
General
The Senfi XProtect Video Adapter provides Senfi integration with the Milestone XProtect Video Management Software.
Features include:
- View live video streams in Senfi
- Send PTZ commands to PTZ camera from Senfi
- Forward and synchronize XProtect alarms to/from Senfi
Senfi XProtect Video Adapter supports XProtect 2018 and later only.
Milestone XProtect Video Management Software Basics
Milestone XProtect is a Video Management Software (VMS) product offered by Milestone Systems A/S. For more information, view here
In the rest of this document, "XProtect" will be used to refer to an installed instance of Milestone XProtect.
XProtect Devices
Several device types can be added to XProtect. The supported device types are:
- Camera devices
- Streams video
- Can have Pan-Tilt-Zoom (PTZ) capability
- Can raise events related to video/video analytics. e.g. Motion Detected Event
- Input devices
- Simple 2-state/binary devices e.g. Tamper detection, momentary trigger
- Can raise events related to changes of its state e.g. Input Rising Event
Note: Devices can also raise other system, device-specific or custom events, but their discussion is beyond the scope of this article.
XProtect Alarms
XProtect devices can raise Alarms from Events. Alarms will be shown in the Milestone XProtect Smart Client's Alarm Manager. Alarms have a name, which is used to identify the type of alarm (i.e. an alarm definition).
Alarms have 4 default states. Users can also add additional alarm states.
- New
- Acknowledged
- On Hold
- Closed
Alarms can be configured with a "related camera". This is mapped to each device that can raise a particular alarm.
Triggered alarms also contain other data such as:
- Local ID
- Priority
- Category
- Description
- Timestamp
Steps to Install and Configure Senfi XProtect Video Adapter
Installation
- Request for a copy of the Senfi XProtect Video Adapter installer by sending an email to us.
- Run the installer on a Windows machine. It uses the following ports by default: 22020, 10085, 10086, 10087.
- After installation, Senfi XProtect Video Adapter can be accessed with the following URL: http://localhost:22020/ui/login
- Users can also use the Start Menu to access this page: Start -> Senfi XProtect Video Adapter (folder) -> Senfi XProtect Video Adapter
Generate Integration Key-Secret Pair
A Senfi API Key and associated secret is required to login/register the Senfi XProtect Video Adapter. View here to generate an integration key/secret pair in the CMS.
Login Page
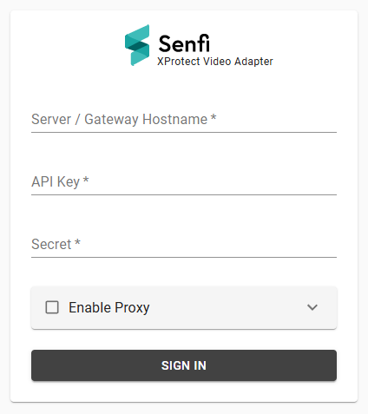
- Server/Gateway Hostname - This should be app.senfi.io
- Login via your Senfi API Key and associated secret pair.
- If you require proxy, please send us an email with your organization name and contact details for further instructions.
Setup Page
This page is used to register the Senfi XProtect Video Adapter with Senfi.
Fill in:
- Server/Gateway Hostname - This should be app.senfi.io
- Video Adapter Name
- Integration Key - Your Senfi API Key
- Secret - Secret to your Senfi API Key
After registration, you will see a Video Adapter ID. The ID and Video Adapter Name will be shown in the Senfi CMS Video page when you use the CMS to configure site/asset to video stream.
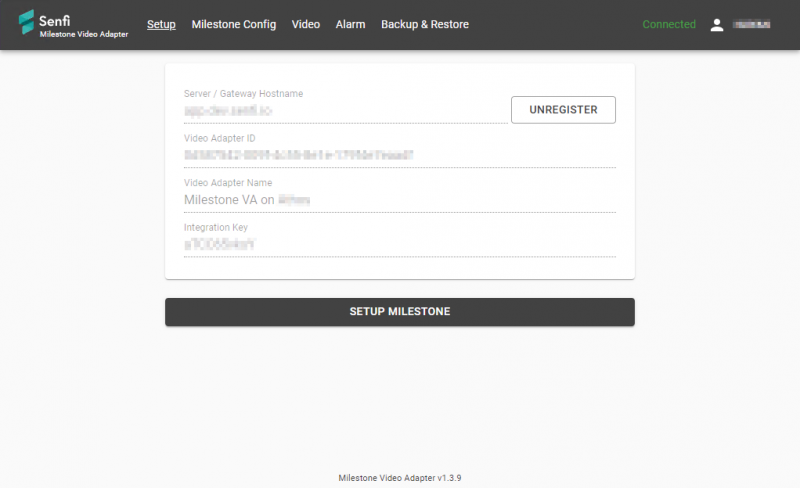
Click Setup XProtect to continue.
XProtect Config
This page is used to configure the connection to the Milestone XProtect server
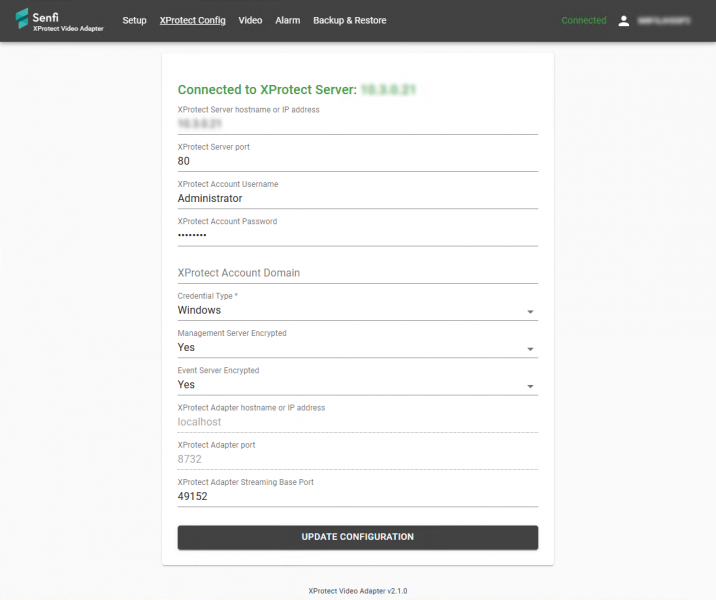
Fill in:
- XProtect Management Server hostname or IP address
- XProtect Server port - 80 (Default)
- XProtect Account Username - Username of an account on XProtect with required Roles*
- XProtect Account Password - Password to above
- XProtect Account Domain (Optional) - Fill this in if your XProtect account is a domain LDAP account
- Credential Type - Windows or Basic Account
- Management Server Encrypted – If XProtect server has SSL enabled (e.g. using https), select “Yes”
- Event Server Encrypted – If XProtect server has SSL enabled (e.g. using https), select “Yes”
- XProtect Adapter hostname or IP address - localhost (Default/Cannot be modified)
- XProtect Adapter port - 8732 (Default/Cannot be modified)
- XProtect Adapter Streaming Base Port - 49152 (Default)
* The following Role permissions on XProtect are required:
- Management Server - Connect
- Cameras - Read, View live, Playback, Read Sequences, Manual PTZ
- Input - Read
- Alarms - Manage, View, Receive Notifications
- Alarm Definitions - View
Click "Update Configuration" to set or change the configuration. If successful, the page will show "Connected to XProtect Server: <IP/Hostname>".
Video
The Video page is used to configure live video from XProtect that will be available for streaming to Senfi.
To add a new Stream
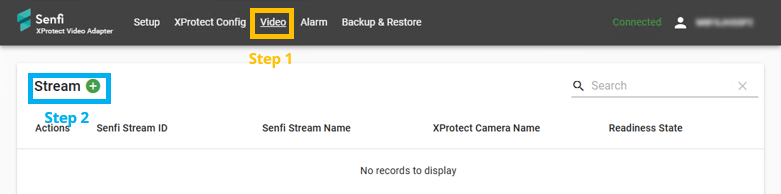
- Go to the "Video" tab.
- Click "Stream +". The Stream > Add New page will appear.
- Specify
- Stream Name
- Stream Type (XProtect)
- Select from the list of cameras in the XProtect server
- If the selected camera has PTZ capability, you can check the "PTZ" checkbox to enable PTZ capability in Senfi
- Preview stream by selecting "PREVIEW" beside "Source URL" (Optional).
- Select "ADD" to add stream.
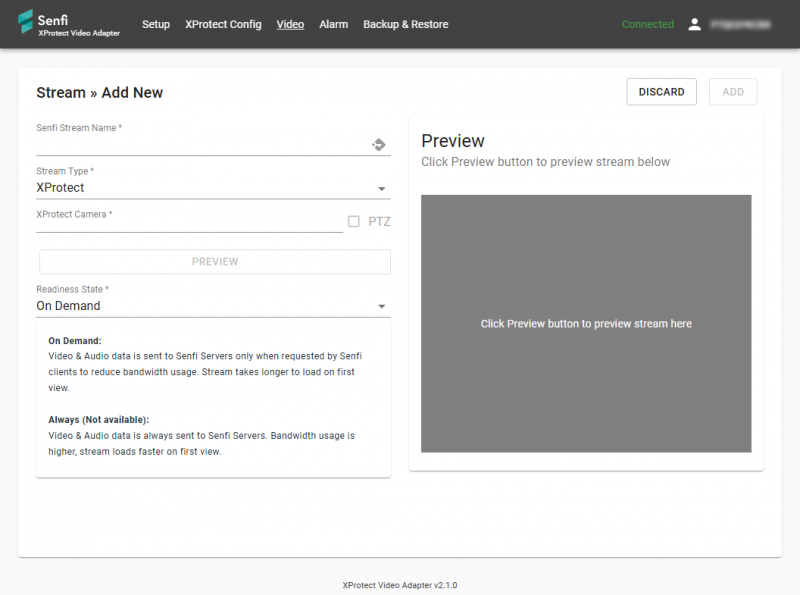
Note:
- This is similar to Video Adapter
- Only "On Demand" state is available.
Alarm
The Alarm page is used to configure XProtect alarms which will be raised as Senfi External Events. Following is the pipeline of how XProtect alarms will be raised as Senfi External Events:
- Something happens to/in a XProtect device
- An alarm is raised by XProtect
- Senfi XProtect Video Adapter is notified
- If an External Event has been configured for the XProtect Alarm and alarm state combination, and that External Event has been selected as raisable for the XProtect device, a Senfi External Event is generated by Senfi XProtect Video Adapter.
- If the External Event (assuming that the External Event is linked to a Senfi Asset in the CMS) has been configured to raise a Senfi Alarm, a Senfi Alarm is raised.
View link for discussion of Senfi's External Events.
The Alarm page is split into 2 tabs:
- Alarm - To configure XProtect Alarm/Alarm state combination mapping to Senfi external event (i.e. which external event to be sent)
- Device - To configure XProtect device mapping to Senfi external event (i.e. which XProtect devices can send which external events)
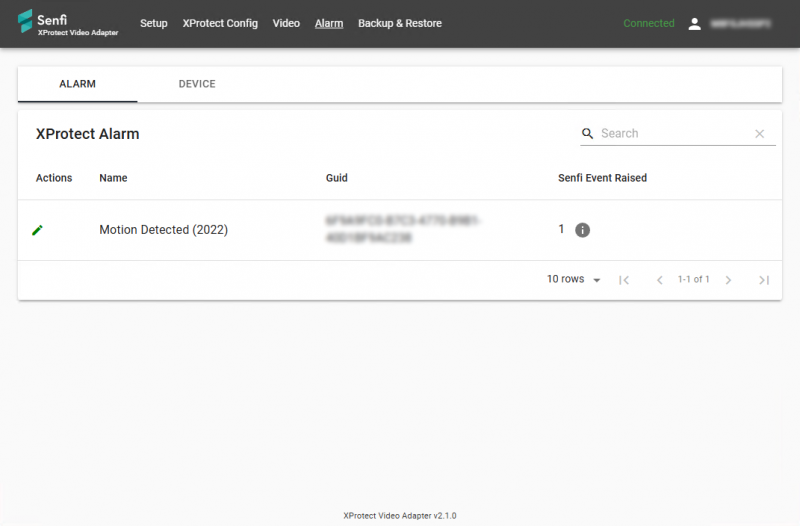
XProtect Alarm Tab
In this tab, a list of XProtect alarm definitions configured on the XProtect Server are shown. To forward an alarm/state combination to Senfi as an external event:
- Click the Pencil icon on the desired XProtect alarm
- In Senfi Event Raised, select + EVENT FOR INCOMING ALARM - 1 Senfi event will be added to be generated when a New alarm is received by the adapter.
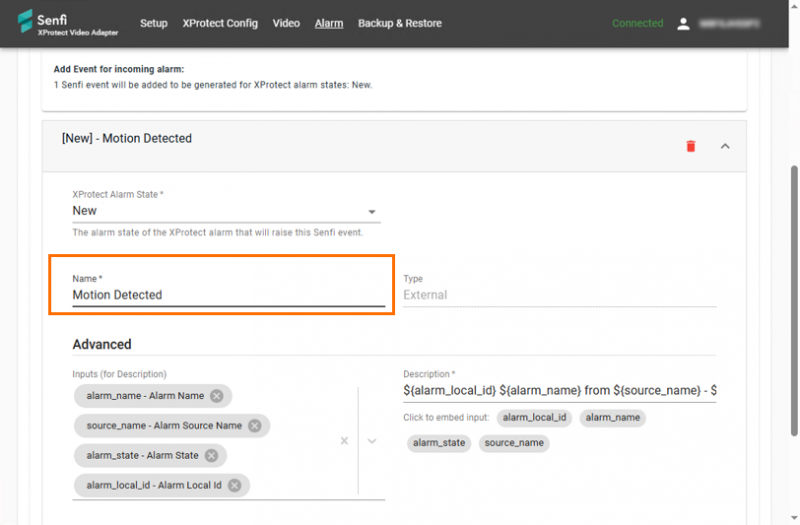
- Fill in Name - Name of external event in Senfi
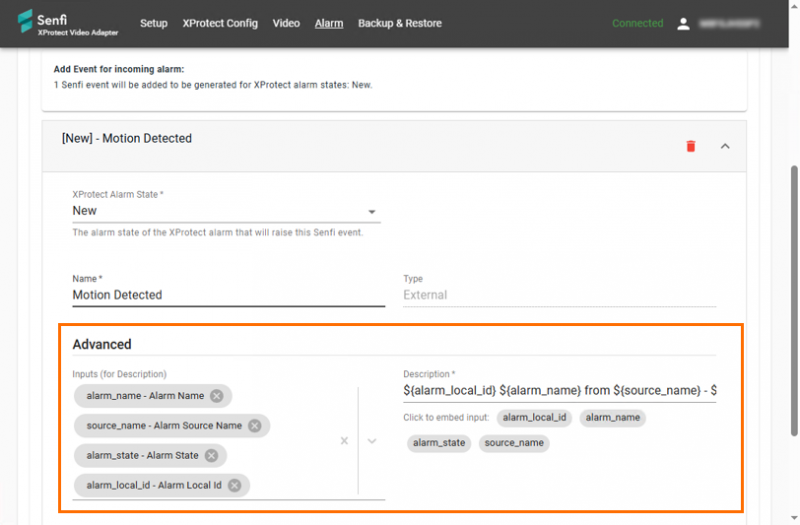
- A standard input and description has been auto-filled to be displayed in the eventual alarm in Senfi. To modify, change in Advanced section:
- Inputs - Select from list of XProtect alarm data you want to use for inputs in the eventual Senfi alarm's description
- Description - Description of the eventual Senfi alarm, with embedded per-alarm-instance inputs
- Click SAVE & EXIT
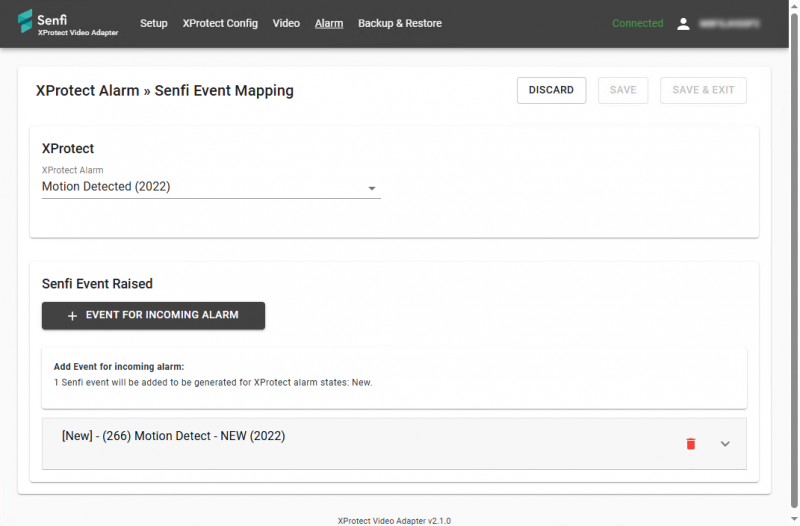
This tab only configures XProtect Alarm/State combo to Senfi External Event mapping. Once configured, the equivalent External Event will automatically be created in Senfi CMS. To associate Senfi External Event from a particular XProtect device to be sent to Senfi, go to the XProtect Device tab.
Note: Only New XProtect Alarm State will generate a Senfi event. Other XProtect Alarm States will update an existing Senfi event.
XProtect Device Tab
In this tab, a list of XProtect camera and input devices configured on the XProtect Server are shown.
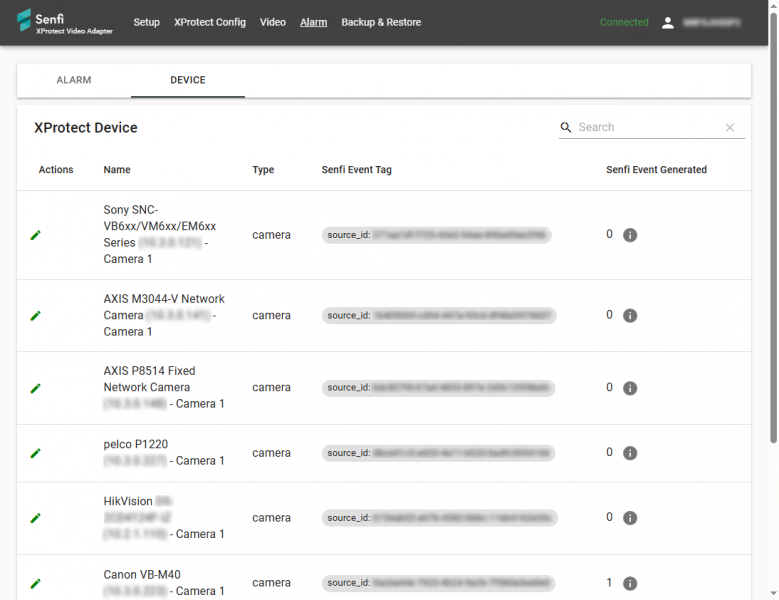
To map mapped alarms (configured in the XProtect Alarm Tab) from XProtect devices to Senfi assets:
- Click the Pencil icon on the desired XProtect device
- Write down the source_id for the corresponding XProtect Device. You will need this information later when configuring Senfi assets in the CMS.
- In Senfi Event Triggered, select one or more mapped Senfi External Event that this XProtect device will trigger in Senfi.
- Click SAVE & EXIT
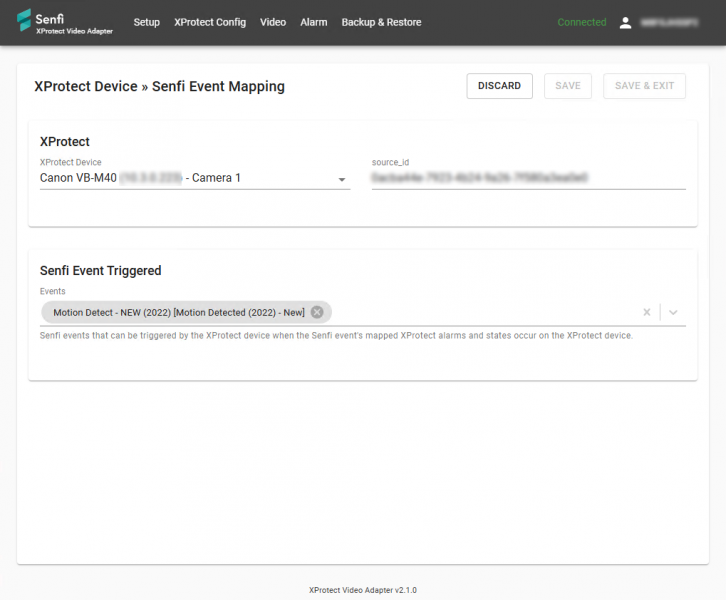
Note: In Step 3, all Senfi External Event mapped by this adapter will be shown. This may include events that cannot be raised by the selected XProtect Device (e.g. a Camera raising an input triggered external event mapped to a XProtect input alarm)
Backup & Restore
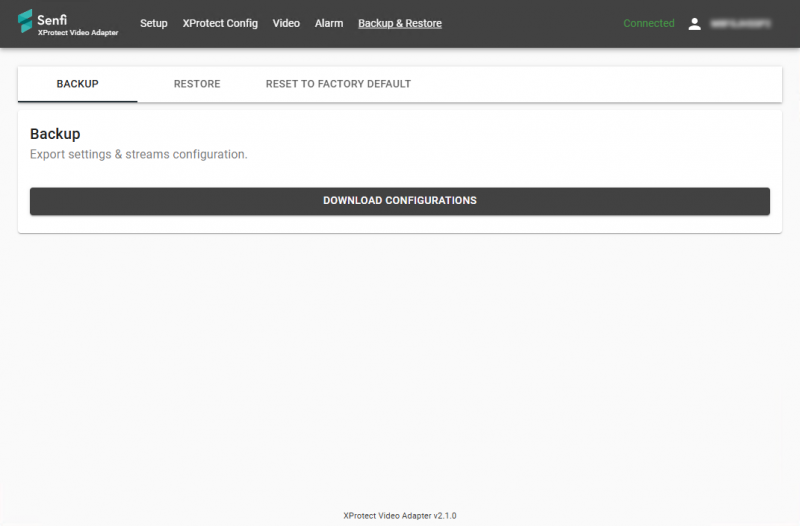
To backup configuration, click BACKUP
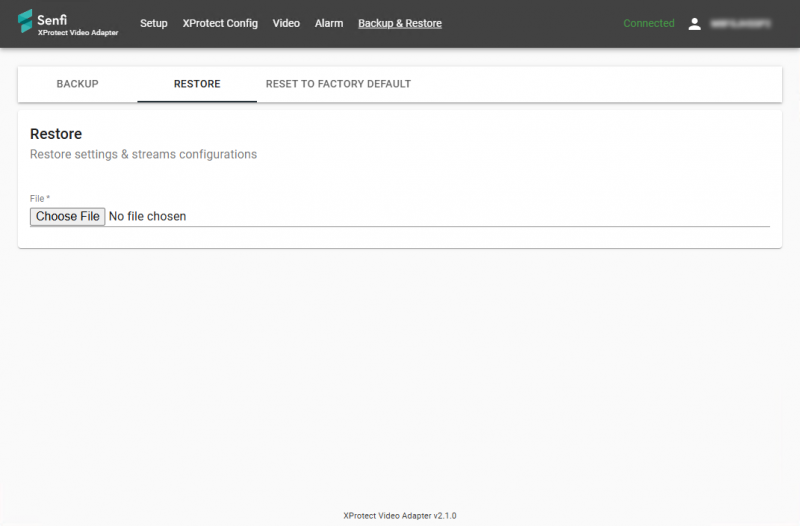
To restore from previously downloaded backup config file, click RESTORE
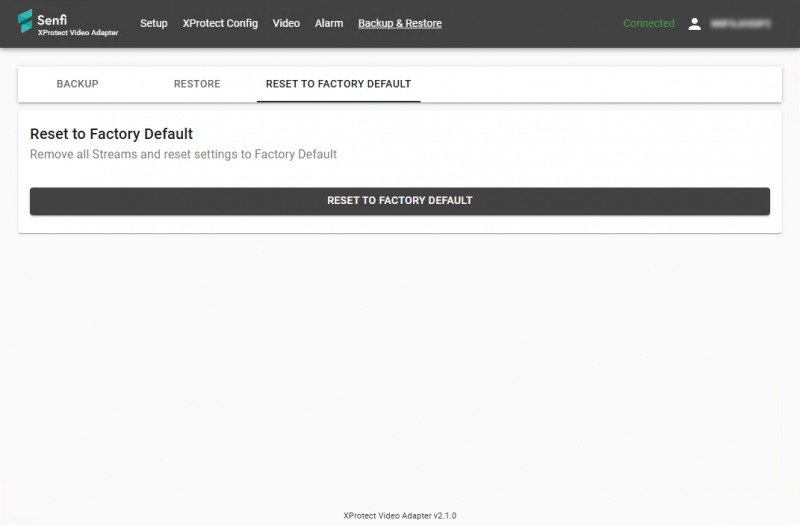
To remove all streams and reset settings to factory default, click RESET TO FACTORY DEFAULT
Steps to Use Configured XProtect Video and External Events in Senfi CMS
To use the configured video and external events in Senfi, additional configuration needs to be performed in the Senfi CMS.
Associate Video Adapter to Site in CMS
- Go to the Video Page
- In the VIDEO ADAPTER tab, find the Name (or Video Adapter ID) of the Senfi XProtect Video Adapter, and click the Pencil icon
- Select the Site to associate this video adapter with
- Optionally, provide a description
- Click the Tick arrow to save.

Link Video Streams to Asset in CMS
- Edit the Asset
- Click + STREAM
- Select the XProtect video camera in the drop down list
- Select whether to Allow PTZ if PTZ has been enabled.
- Preview stream by selecting "PREVIEW" beside "Source URL" (Optional).
- Click SAVE & EXIT
Link External Event to Asset in CMS
For External Events generated by Senfi XProtect Video Adapter to be attributed to a Senfi Asset, the Senfi Asset must be configured with an External Event source, with the source_id you written down in the "XProtect Device Tab" section Step 2.
- Edit the Asset
- Click + EVENT
- Select the External Event in the drop down list
- User Tags, enter the source_id of the XProtect device. This is the source_id you have written earlier in "XProtect Device Tab" Step 2
- Click SAVE & EXIT
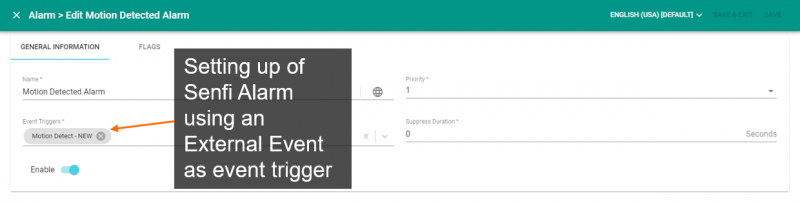
Raising External Alarms in CMS
By setting up and linking an external event to an asset does not mean that alarms from external systems will be directly raised in Senfi. All external alarms must be raised by proxy using external events, which then trigger Senfi alarms using Senfi's automation workflow.
- Follow Add Alarm to add Alarm.
- Select external event as event trigger