
V2/Digital Twin Tutorial/Viewing Site/Navigate Site
3D Navigation
Perspective View
Pan Model
- Move cursor to within the 3D Model Area.
- Click the mouse pad with two fingers.
- Move cursor to pan model in required direction.
Tilt Model
- Move cursor to within the 3D Model Area.
- Click the mouse pad with one finger.
- Move cursor to tilt model in required direction.
Zoom In/Out
- Move cursor to within the 3D Model Area.
- Place two fingers on the mouse pad.
- Scroll up/down to Zoom in/out.
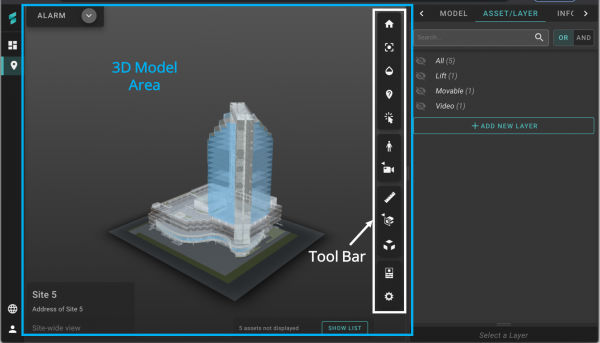
Tool Bar
The tools available in the Tool Bar include:
-
 Home View
-
 Fit To View
-
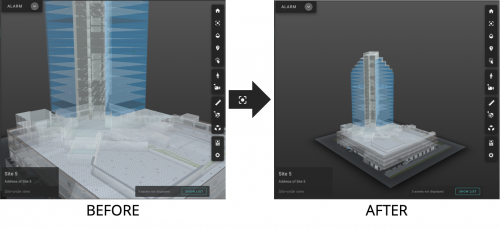
 Toggle Model Transparency
-
 Toggle Asset Status
-
 Toggle Select Model
-
 First Person
-
 Camera Interactions
-
 Measure
-
 Section Analysis
-
 Explode Model
-
 Properties
-
 Settings
Home View
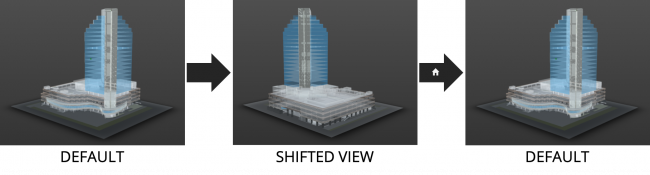
Selecting ![]() Home View shifts the 3D Model back to its default position.
Home View shifts the 3D Model back to its default position.
Fit To View
Selecting ![]() Fit To View fits the entire 3D Model within the 3D Model Area.
Fit To View fits the entire 3D Model within the 3D Model Area.
Toggle Model Transparency
Selecting ![]() Toggle Model Transparency changes the transparency of the 3D Model.
Toggle Model Transparency changes the transparency of the 3D Model.
Toggle Asset Status
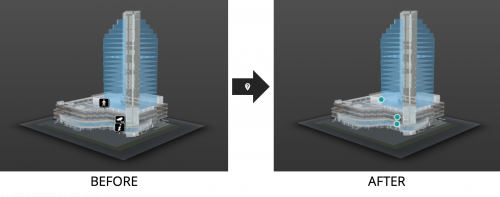
Selecting ![]() Toggle Asset Status changes the how assets are represented on the 3D Model.
Toggle Asset Status changes the how assets are represented on the 3D Model.
Toggle Select Model
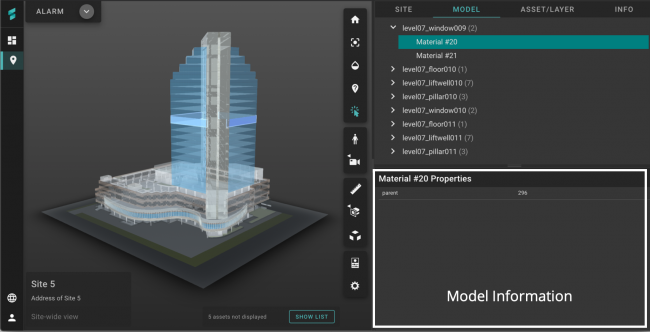
Selecting ![]() Toggle Select Model allows you to select individual models on the 3D Model and get more information about them.
Toggle Select Model allows you to select individual models on the 3D Model and get more information about them.
- The right panel will be toggled to the "MODEL" tab with the selected model highlighted.
- The information of the selected model will be displayed at the bottom of the right panel.
First Person
Selecting ![]() First Person changes the 3D Model navigation mode to First Person.
First Person changes the 3D Model navigation mode to First Person.
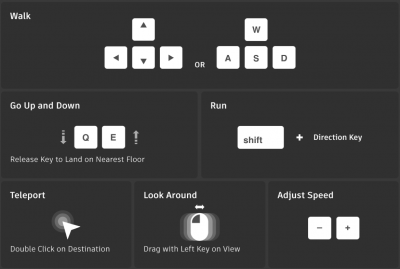
When selected, a pop-up detailing how to navigate in first person will appear.
Camera Interactions
Selecting ![]() Camera Interactions gives rise to 3 additional options:
Camera Interactions gives rise to 3 additional options:
-
 Fit To View
-
 Focal Length: Change the Focal Length of the 3D Model.
- Move cursor to within the 3D Model Area.
- Click the mouse pad with one finger.
- Move cursor to change focal length as desired.
-
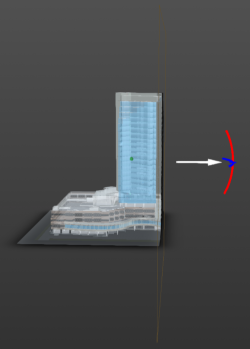
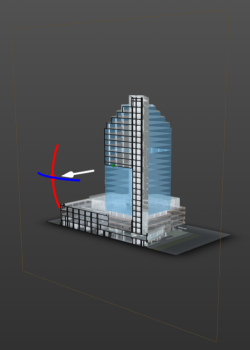
 Roll: Roll the 3D Model around.
- Move cursor to within the 3D Model Area.
- Click the mouse pad with one finger.
- Move cursor to roll model.
Measure
Selecting ![]() Measure gives rise to 5 additional options:
Measure gives rise to 5 additional options:
-
 Distance: Measure the distance between two points on the 3D Model.
- Select two points on the 3D Model.
-
 Angle: Calculate the angle between two points.
- Select two points on the 3D Model.
- The X, Y, Z distance between the two points will be displayed.
-
 Calibrate: Adjust the readings of the model measurement tool.
- Select two points on the 3D Model.
- Define the size that it represents.
- Change the "Unit Type" by choosing from the Unit type dropdown list.
-
 Delete: Delete a measurement from the model.
- Select the measurement.
- Select Delete.
-
 Measure Settings:
- Change the "Unit Type" of measurements by choosing from the Unit type dropdown list.
- Change the "Precision" of measurements by choosing from the Precision dropdown list.
- Change preference for Isolate Measurement (show only the measurements on the 3D Model):
-
 Enable Isolate Measurement
 -
 Disable Isolate Measurement
-
- Change preference for Free Measure (measurements outside of the 3D Model is allowed):
-
 Enable Free Measure
 -
 Disable Free Measure
-
Section Analysis
Selecting ![]() Section Analysis gives rise to 4 additional options:
Section Analysis gives rise to 4 additional options:
-
 Add X Plane: Add a plane along the model's X-Axis.
- Move plane along the X-axis: Pull/Push the arrow.
- Rotate plane about the Y-axis: Select the blue line and move along the circle that appears.
- Rotate the plane about the Z-axis: Select the red line and move along the circle that appears.
-
 Add Y Plane: Add a plane along the model's Y-Axis.
- Move plane along the Y-axis: Pull/Push the arrow.
- Rotate plane about the Z-axis: Select the blue line and move along the circle that appears.
- Rotate the plane about the X-axis: Select the red line and move along the circle that appears.
-
 Add Z Plane: Add a plane along the model's Z-Axis.
- Move plane along the Z-axis: Pull/Push the arrow.
- Rotate plane about the X-axis: Select the blue line and move along the circle that appears.
- Rotate the plane about the Y-axis: Select the red line and move along the circle that appears.
-
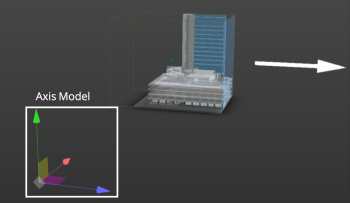
 Add Box: Add a box around the model.
- Expand Box: Select the face of the box to be extended/shrunk and Pull/Push the arrow that appears.
- Shift Box: Select one of the axis/square on the Axis Model and move accordingly.

Explode Model
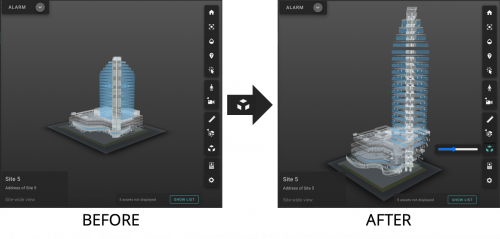
Selecting ![]() Explode Model takes the 3D Model apart.
Explode Model takes the 3D Model apart.
- Sliding the scroll bar to the right moves individual pieces further from each other.
Properties
Selecting ![]() Properties shows the name of a selected piece on the 3D Model.
Properties shows the name of a selected piece on the 3D Model.
- If no piece is selected, Max Scene is shown.
Settings
Selecting ![]() Settings allows you to change the following settings:
Settings allows you to change the following settings:
- Configuration Settings
- Navigation Settings
- Appearance Settings
- Environment Settings