
V2/CMS Tutorial/User Tools/Creating Content/Site/Add Site/Handdrawn
From Senfi Docs
Contents
Add Site with User Drawn Model
Adding a Site using a User Drawn Model can be broken down into six major steps:
- Create New Site
- Fill in General Information
- Choose Model Type
- Fill in BBL information
- Add Footprint
- Set Default View and Thumbnail
Note: Mandatory fields are marked with an ‘*’. The following steps assume that the user is already logged in to the CMS.
Create New Site

- Go to the
 Site tab.
 - Select
 ADD NEW. Go to Fill in General Information.
Fill in General Information
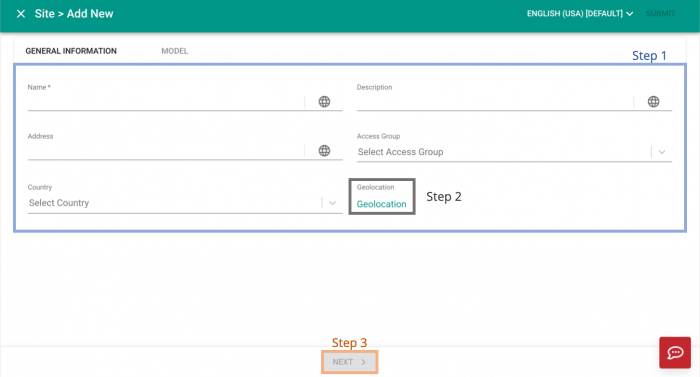
- Fill in the necessary fields (E.g. Site Name, Description, Country, Address etc.).
- Add Geolocation (optional):
- Select Geolocation.
- There are two ways to select location:
- Search:
- Use the
 Search function to look for the specific location.
- Drop Pin:
- Drag the map to the required location.
- Select "EDIT".
- Drop pin at the site location on the map.
- See Tip and Note (below).
- Select 'OK' to add geolocation. This will automatically update the country of the site but not its address.
- Select "NEXT". Go to Choose Model Type.
Tip: Subsequently, the pin can be dragged to different positions on the map.
Note: For subsequent changes, the displayed address will not be automatically updated. The  Use Address button must be selected to update the address.
Choose Model Type
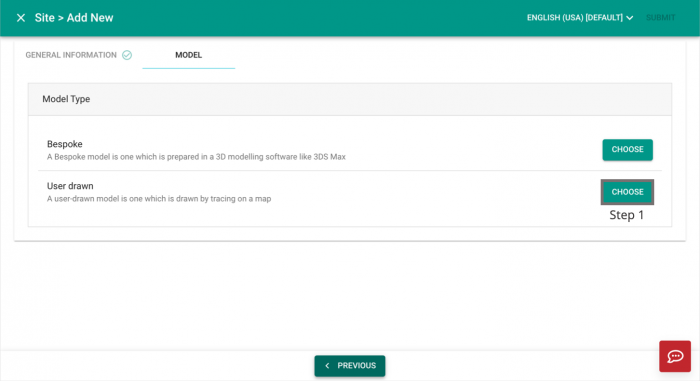
- Choose "User Drawn" model type.
- Go to Fill in Building, Block & Level (BBL) information.
Fill in BBL Information

- Add Building (Optional).
- Select
 Add beside Site Name.
 - Insert Building Name.
- Select 'SAVE'.
- Select
- Rename Building (Optional).
- Select
 Edit beside Building Name.
 - Rename Building.
- Select 'SAVE'.
- Select
- Add Block (Optional).
- Select Add beside Building Name.
- Insert Block Name and Ground Floor Position.
- Select 'SAVE'.
- Select
- Edit Block (Optional).
- Select Edit beside Block Name.
- Rename Block and/or change ground floor position.
- Select 'SAVE'.
- Select
- Add Level.
- Add Individual Level:
- Select Add beside Block Name.
- Choose the level type:
- Level Below Ground: Basement Level
- Level Above Ground
- Add Level Name.
- Add Level Height.
- Select 'SAVE'.
- Add Multiple Levels:
- Select Add beside Block Name to add new levels under that block.
- Choose the level type:
- Level Below Ground: Basement Level
- Level Above Ground
- Add desired number of levels (greater than 1).
- Leave Level Name blank (rename after added).
- Add Level Height (all levels will use the same height).
- Select 'SAVE'.
- Edit Level (Optional).
- Select Edit beside Level Name.
- Rename Level and/or change its height.
- Select 'SAVE'.
- Select
- Select "NEXT". Go to Add Footprint.
Add Footprint
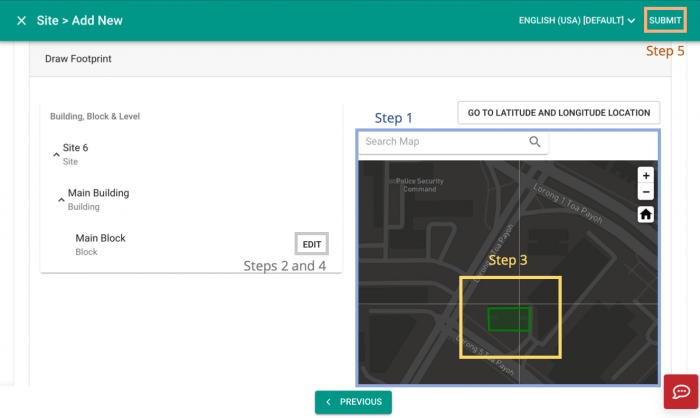
- Navigate to the building location on the map either by
 searching or dragging the map.
 - Select "EDIT" beside Block Name to enter edit mode.
- Trace the block’s outline by selecting points on the map.
- Select "EDITING" beside Block Name to exit edit mode.
- Select "SUBMIT" (top right corner) to add the Site.
- Once the 3D model has been processed, further action will be prompted.
- Go to Set Default View and Thumbnail.

Tip:
- A node can be repositioned by selecting it and dragging it to a different position.
- "GO TO LATITUDE AND LONGTITUDE LOCATION" can be used to reposition the map to the location of the site's footprint.
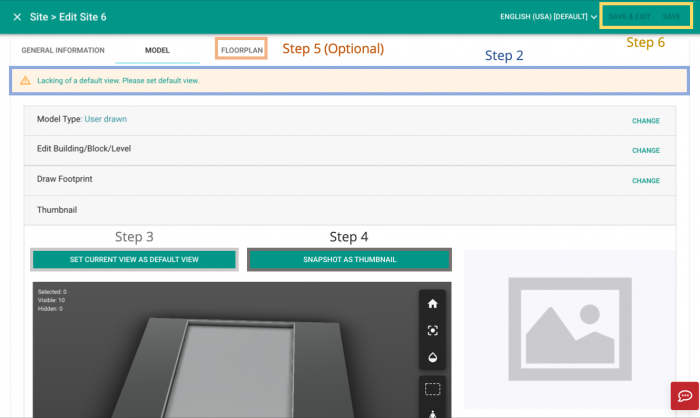
Set Default View and Thumbnail
- Select
 Edit beside the site you just created.
 - Select the
 warning at the top of the screen.
 - Set the site’s default view.
- Set the site’s thumbnail (optional).
- Add 2D Floorplans for each level (optional).
- Select "SAVE" or "SAVE & EXIT" (top right corner).