
Adding a site
From Senfi Docs
Pre-requisites
- 3D model with BBL information for Bespoke type
- BBL information for User Drawn type
- 2D floorplan
Please read this page to be familiar with the concepts related to site.
Add New Site with User Drawn Model
- Login to the CMS
- Go to the Site tab
- Click the + button
- Fill in the necessary fields (Eg. Site Name, Description, Country, Address, etc...)
- Choose User Drawn model type
- Navigate to the building location in map (Can use search feature)
- Click the EDIT button to enter edit mode
- Trace building outline by clicking on the map
- Click the STOP EDITING button to confirm the outline
- Click PREVIEW tab to preview the 3D building
- Click SET DEFAULT VIEW button to set the initial view in dashboard
- Add BBL information under Building, Block & Level section
- Add Building
- Click + button beside Site
- Add Building Name
- Click SAVE
- Add Block
- Click + button beside Building Name to add new block under that building
- Add Block Name
- Add Base Position
- The position of the block's base
- Click SAVE
- Add Level
- Click + button beside Block Name to add new level under that block
- Choose the level type
- Below Ground: basement level
- Above Ground
- Add Level name
- Add Height
- Click SAVE
- Add multiple Levels
- Click + button beside Block Name to add new levels under that block
- Choose the level type
- Below Ground: basement level
- Above Ground
- Add No.of Levels
- Add Height (All of the levels are using the same height)
- Click SAVE
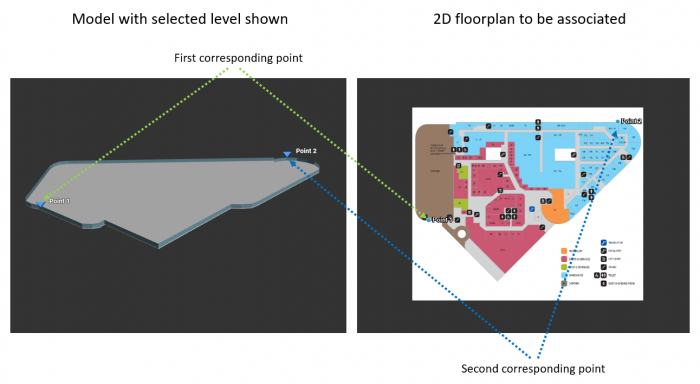
- Add 2D floorplan
- Click floorplan icon button beside edit icon button
- Select 2D floorplan image file
- Add 3D & 2D reference points
- Click SAVE
- Click SAVE
Add New Site with Bespoke Model
- Login to the CMS
- Go to the Site tab
- Click the + button
- Fill in the necessary fields (Eg. Site Name, Description, Country, Address, etc...)
- Choose Bespoke model type
- Select 3D building model file (zip file)
- Click SET DEFAULT VIEW button to set the initial view in dashboard
- Click SAVE