
Difference between revisions of "V2/CMS Tutorial/User Tools/Creating Content/Asset/Asset/Annotation"
From Senfi Docs
| Line 31: | Line 31: | ||
## When Dash ratio is set to 1.0, the gap covers the whole line. | ## When Dash ratio is set to 1.0, the gap covers the whole line. | ||
# Select "Follow Asset" if you require the line annotation to follow the asset as it moves. | # Select "Follow Asset" if you require the line annotation to follow the asset as it moves. | ||
| − | |||
| − | |||
| − | |||
===Steps to Adding Volume Annotation=== | ===Steps to Adding Volume Annotation=== | ||
| Line 42: | Line 39: | ||
# Click "Edit in 3D" to start creating volume [[File:Add_Volume_Steps5-6.png|thumb|center|700px|Steps 5 and 6 to add volume annotation to an Asset|link=]] | # Click "Edit in 3D" to start creating volume [[File:Add_Volume_Steps5-6.png|thumb|center|700px|Steps 5 and 6 to add volume annotation to an Asset|link=]] | ||
# Click on 3D view on the right to create a vertex. | # Click on 3D view on the right to create a vertex. | ||
| − | ## You need to create at least 3 vertices before the volume appears. | + | ## Click [[File:Point_Add.png|30px|link=]] to add a point. |
| + | ## Click [[File:Point_Select_Move.png|30px|link=]] to select and/or move a point. | ||
| + | ## Click [[File:Point_Delete_Selected.png|30px|link=]] to delete a point. | ||
| + | ## Click [[File:Point_Line_Edit_Settings.png|30px|link=]] to change line edit settings. | ||
| + | ## Click [[File:Point_Translate.png|30px|link=]] to configure translate settings. | ||
| + | # You need to create at least 3 vertices before the volume appears. | ||
# Click "Editing" to finish creating volume [[File:Add_Volume_Steps7-12.png|thumb|center|500px|Steps 7 to 12 to add volume annotation to an Asset|link=]] | # Click "Editing" to finish creating volume [[File:Add_Volume_Steps7-12.png|thumb|center|500px|Steps 7 to 12 to add volume annotation to an Asset|link=]] | ||
# Select a Color | # Select a Color | ||
| Line 50: | Line 52: | ||
# Change "Rotation" to adjust volume orientation. | # Change "Rotation" to adjust volume orientation. | ||
# Select "Follow Asset" if you require the volume annotation to follow the asset as it moves. | # Select "Follow Asset" if you require the volume annotation to follow the asset as it moves. | ||
| − | |||
| − | |||
| − | |||
===Steps to Adding 3D Text Annotation=== | ===Steps to Adding 3D Text Annotation=== | ||
| Line 67: | Line 66: | ||
# Change "Rotation" to adjust 3D text orientation | # Change "Rotation" to adjust 3D text orientation | ||
# Select "Follow Asset" if you require the 3D text annotation to follow the asset as it moves. | # Select "Follow Asset" if you require the 3D text annotation to follow the asset as it moves. | ||
| − | |||
| − | |||
| − | |||
===Steps to Adding 2D Text Annotation=== | ===Steps to Adding 2D Text Annotation=== | ||
| Line 82: | Line 78: | ||
# Set "Offset X" and/or "Offset Y" if offset of 2D text annotation from original position is required. | # Set "Offset X" and/or "Offset Y" if offset of 2D text annotation from original position is required. | ||
# Change "Rotation" to adjust 2D text orientation | # Change "Rotation" to adjust 2D text orientation | ||
| − | # Select "Follow Asset" if you require the 2D text annotation to follow the asset as it moves | + | # Select "Follow Asset" if you require the 2D text annotation to follow the asset as it moves. |
| − | |||
| − | |||
| − | |||
Revision as of 14:20, 18 January 2022
Contents
Add Asset Annotation
An annotation is used to add visual information to an asset. Senfi supports 4 types of annotation, namely:
- Line
- Volume
- 3D Text
- 2D Text
An asset can have more than one annotation.
Steps to Adding Line Annotation
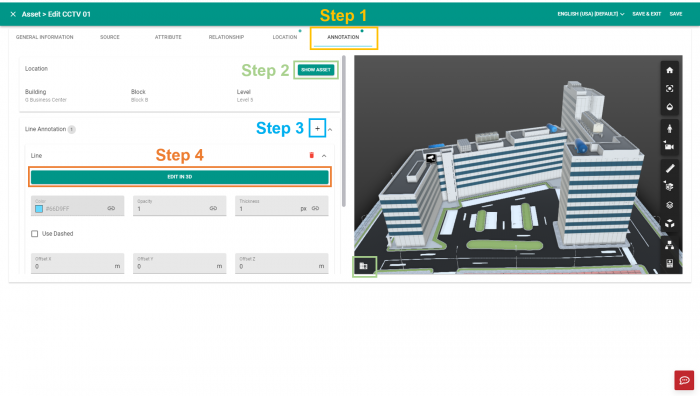
- Go to "Annotation" tab
- Click on "Show Asset" if you wish to place the line annotation at where the asset is located. This will help hide the 3D model above the asset's location. Else you can select
 to choose Building, Block and Level where the line annotation is to be placed on.
 - Click
 on the right of "Line Annotation"
 - Click "Edit in 3D" to start creating line
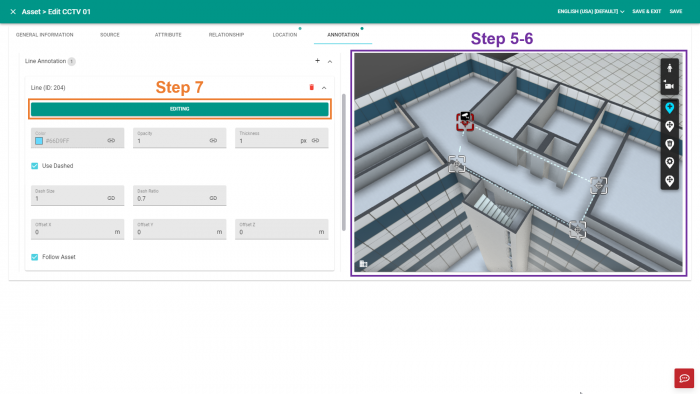
- Click on 3D view to create a vertex.
- Click
 to add a point.
 - Click
 to select and/or move a point.
 - Click
 to delete a point.
 - Click
 to change line edit settings.
 - Click
 to configure translate settings.
- Click
- You need to create at least 2 vertices before the line appears.
- Click "Editing" to finish creating line
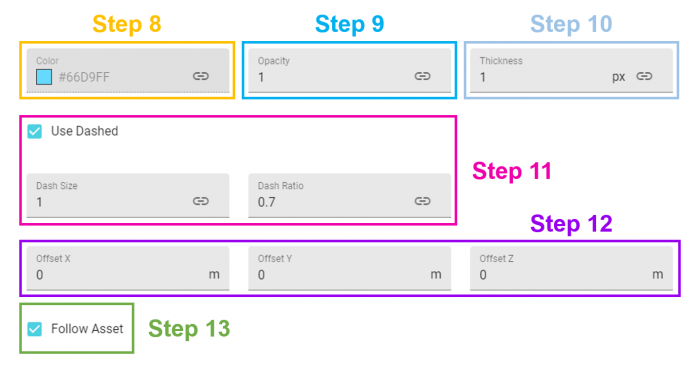
- Select a Color
- Set "Opacity" (value from 0 to 1)
- Set "Thickness"
- Check "Use Dashed" if you want a dashed line. If Dashed line is chosen, you can set the "Dash size" and "Dash ratio".
- Set "Offset X", "Offset Y" and/or "Offset Z" if offset of line annotation from original plotted position is required.
- The larger the Dash size, the longer the pattern.
- When Dash ratio is set to 0.05, the gap covers very little of the line.
- When Dash ratio is set to 1.0, the gap covers the whole line.
- Select "Follow Asset" if you require the line annotation to follow the asset as it moves.
Steps to Adding Volume Annotation
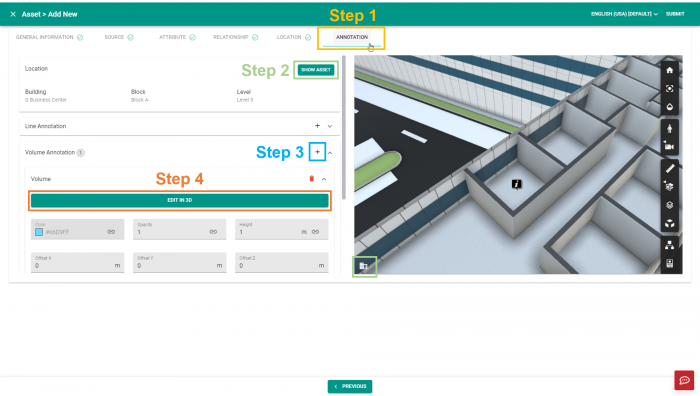
- Go to "Annotation" tab
- Click on "Show Asset" if you wish to place the line annotation at where the asset is located. This will help hide the 3D model above the asset's location. Else you can select to choose Building, Block and Level where the line annotation is to be placed on.
- Click on the right of "Volume Annotation"
- Click "Edit in 3D" to start creating volume
- Click on 3D view on the right to create a vertex.
- Click to add a point.
- Click to select and/or move a point.
- Click to delete a point.
- Click to change line edit settings.
- Click to configure translate settings.
- Click
- You need to create at least 3 vertices before the volume appears.
- Click "Editing" to finish creating volume
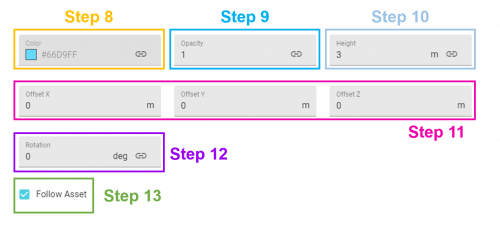
- Select a Color
- Set "Opacity" (value from 0 to 1)
- Set "Height"
- Set "Offset X", "Offset Y" and/or "Offset Z" if offset of volume annotation from original plotted position is required.
- Change "Rotation" to adjust volume orientation.
- Select "Follow Asset" if you require the volume annotation to follow the asset as it moves.

Steps to Adding 3D Text Annotation
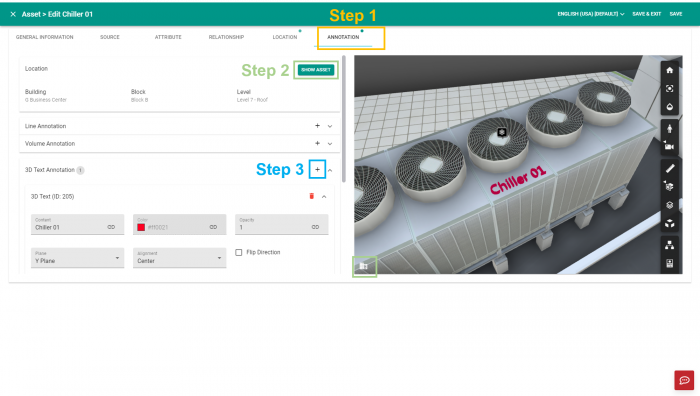
- Go to "Annotation" tab
- Click on the right of "3D Text Annotation"
- Select the "Plane" you want the text to be in.
- You can flip the direction of the text by checking "Flip Direction"
- Type a text in "Content"
- Increase "Size" until you can see the 3D text
- Select a color
- Set "Opacity"
- Set "Offset X", "Offset Y" and/or "Offset Z" if offset of 3D text annotation from original position is required.
- Change "Rotation" to adjust 3D text orientation
- Select "Follow Asset" if you require the 3D text annotation to follow the asset as it moves.
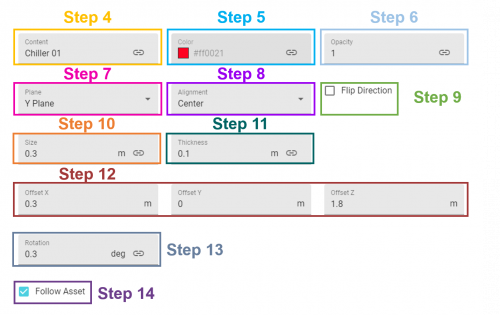
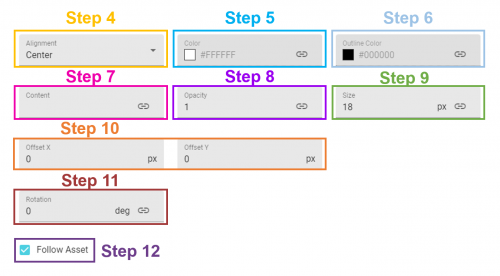
Steps to Adding 2D Text Annotation
- Go to "Annotation" tab
- Click on the right of "3D Text Annotation"
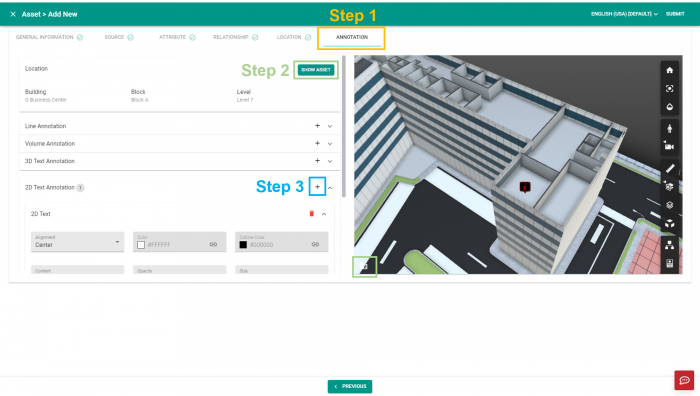
- Set "Alignment"
- Type a text in "Content"
- Select a color
- Set "Opacity"
- Set "Size"
- Set "Offset X" and/or "Offset Y" if offset of 2D text annotation from original position is required.
- Change "Rotation" to adjust 2D text orientation
- Select "Follow Asset" if you require the 2D text annotation to follow the asset as it moves.