
Difference between revisions of "Adding a site"
From Senfi Docs
(Created page with "=== Pre-requisites === * 3D model with BBL information for '''Bespoke''' type * BBL information for '''User Drawn''' type * 2D floorplan === Model Type === There are two type...") |
|||
| Line 6: | Line 6: | ||
=== Model Type === | === Model Type === | ||
There are two types: | There are two types: | ||
| + | ; User Drawn | ||
| + | : Template 3D building generate based on the building outline drawn using outline drawing tool provided by CMS. | ||
| + | [[File:Sample generated building.png|thumb|600px|center|Sample building generated from building outline|link=]] | ||
; Bespoke | ; Bespoke | ||
: 3D building modelled using modelling software such as Autodesk 3DS Max, SketchUp etc. | : 3D building modelled using modelling software such as Autodesk 3DS Max, SketchUp etc. | ||
| − | + | [[File:Sample bespoke building.png|thumb|600px|center|Sample building modelled using 3D software|link=]] | |
| − | : | + | |
| + | === Add New Site with User Drawn Model === | ||
| + | # Login to the [https://ems.senfi.io/cms CMS] | ||
| + | # Go to the '''Site''' tab | ||
| + | # Click the '''+''' button | ||
| + | # Fill in the necessary fields (Eg. Site Name, Description, Country, Address, etc...) | ||
| + | # Choose '''User Drawn''' model type | ||
| + | # Navigate to the building location in map (Can use search feature) | ||
| + | # Click the '''EDIT''' button to enter edit mode | ||
| + | # Trace building outline by clicking on the map | ||
| + | # Click the '''STOP EDITING''' button to confirm the outline | ||
| + | # Add BBL information under '''Building, Block & Level''' section | ||
| + | |||
| + | |||
| + | === Add Building, Block & Level === | ||
| + | ==== Add Building ==== | ||
| + | # Click '''+''' button beside '''Site''' | ||
| + | # Add Building Name | ||
| + | # Click '''SAVE''' | ||
| + | |||
| + | ==== Add Block ==== | ||
| + | # Click '''+''' button beside '''Building Name''' to add new block under that building | ||
| + | # Add Block Name | ||
| + | # Add Base Position | ||
| + | #* The position of the block's base | ||
| + | # Click '''SAVE''' | ||
| + | |||
| + | ==== Add Level ==== | ||
| + | # Click '''+''' button beside '''Block Name''' to add new level under that block | ||
| + | # Choose the level type | ||
| + | #* Below Ground: basement level | ||
| + | #* Above Ground | ||
Revision as of 14:59, 16 September 2019
Contents
Pre-requisites
- 3D model with BBL information for Bespoke type
- BBL information for User Drawn type
- 2D floorplan
Model Type
There are two types:
- User Drawn
- Template 3D building generate based on the building outline drawn using outline drawing tool provided by CMS.
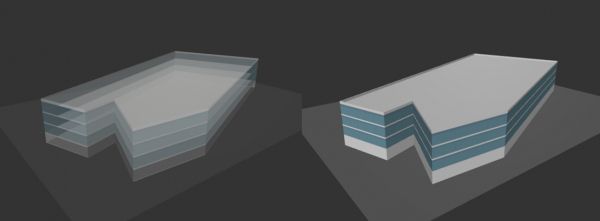
- Bespoke
- 3D building modelled using modelling software such as Autodesk 3DS Max, SketchUp etc.
Add New Site with User Drawn Model
- Login to the CMS
- Go to the Site tab
- Click the + button
- Fill in the necessary fields (Eg. Site Name, Description, Country, Address, etc...)
- Choose User Drawn model type
- Navigate to the building location in map (Can use search feature)
- Click the EDIT button to enter edit mode
- Trace building outline by clicking on the map
- Click the STOP EDITING button to confirm the outline
- Add BBL information under Building, Block & Level section
Add Building, Block & Level
Add Building
- Click + button beside Site
- Add Building Name
- Click SAVE
Add Block
- Click + button beside Building Name to add new block under that building
- Add Block Name
- Add Base Position
- The position of the block's base
- Click SAVE
Add Level
- Click + button beside Block Name to add new level under that block
- Choose the level type
- Below Ground: basement level
- Above Ground