
Difference between revisions of "V2/CMS Tutorial/User Tools/Creating Content/Measurement/Computed Measurement"
From Senfi Docs
Elysia.Tan (talk | contribs) |
Elysia.Tan (talk | contribs) |
||
| Line 1: | Line 1: | ||
<h1 class="main-heading">Add Computed Measurement</h1> | <h1 class="main-heading">Add Computed Measurement</h1> | ||
| + | |||
| + | <h1 class="main-heading">Add Measurement</h1> | ||
| + | |||
| + | Adding a Computed Measurement can be broken down into five major steps: | ||
| + | # [[#Create New Measurement|Create New Measurement]] | ||
| + | # [[#Fill in General Information|Fill in General Information]] | ||
| + | # [[#Choose Measurement Type|Choose Measurement Type]] | ||
| + | # [[#Add Metric|Add Metric]] | ||
| + | # [[V2/CMS_Tutorial/User_Tools/Creating_Content/Measurement/Computed_Measurement/Script|Add Script]] | ||
<div class="important">Note: Mandatory fields are marked with an ‘*’. The following steps assume that the user is already logged in to the [https://app.senfi.io/cms/ CMS]. </div> | <div class="important">Note: Mandatory fields are marked with an ‘*’. The following steps assume that the user is already logged in to the [https://app.senfi.io/cms/ CMS]. </div> | ||
| − | === | + | ===Create New Measurement=== |
| − | # Go to the [[File:Measurement_Icon.png|30px|link=]] '''Measurement''' tab | + | [[File:Create_measurement_steps.png|thumb|center|800px|Steps to create a new Measurement|link=]] |
| − | # Fill in the necessary fields ( | + | # Go to the [[File:Measurement_Icon.png|30px|link=]] '''Measurement''' tab. |
| + | # Select [[File:add.png|70px|link=]] '''ADD NEW'''. Go to [[#Fill in General Information|Fill in General Information]]. | ||
| + | |||
| + | ===Fill in General Information=== | ||
| + | [[File:Fill_in_measurement_information.png|thumb|center|600px|Fill in Measurement's general information|link=]] | ||
| + | # Fill in the necessary fields (Name, Code, Access Group). | ||
| + | # Fill in the [[V2/Concepts/Intro_to_Tag|Tags]] and Required Tags. | ||
#* There must '''at least be one required tag''' selected. | #* There must '''at least be one required tag''' selected. | ||
# Set the '''Data Retention (days)''' of the measurement. | # Set the '''Data Retention (days)''' of the measurement. | ||
#* '''Data Retention (days):''' Number of days data for the measurement should be stored in the CMS after it has been received. | #* '''Data Retention (days):''' Number of days data for the measurement should be stored in the CMS after it has been received. | ||
| − | # Choose | + | # Select "NEXT". Go to [[#Choose Measurement Type|Choose Measurement Type]]. |
| − | # Add ''' | + | |
| + | ===Choose Measurement Type=== | ||
| + | [[File:Choose_measurement_type_computed.png|thumb|center|600px|Choose Computed Measurement Measurement Type|link=]] | ||
| + | # Choose "Computed Measurement" measurement type. | ||
| + | # Select "NEXT". Go to [[#Add Metric|Add Metric]]. | ||
| + | |||
| + | ===Add Metric=== | ||
| + | [[File:Add_metric_steps.png|thumb|center|600px|Steps to add Metrics|link=]] | ||
| + | # Add '''Metric''' (at least one). | ||
#* '''Lift:''' | #* '''Lift:''' | ||
## Check the '''Has lift metrics''' box. | ## Check the '''Has lift metrics''' box. | ||
#* '''Movable:''' | #* '''Movable:''' | ||
## Check the '''Has movable metrics''' box. | ## Check the '''Has movable metrics''' box. | ||
| − | #* ''' | + | #* '''User-defined:''' |
## Fill in the '''Name''', '''Code''' and '''Type'''. | ## Fill in the '''Name''', '''Code''' and '''Type'''. | ||
| − | ## Set the '''readability and writability''' of the | + | ## Set the '''readability and writability''' of the Metric. |
## Select '''ADD NEW'''. | ## Select '''ADD NEW'''. | ||
| − | # | + | # Go to [[V2/CMS_Tutorial/User_Tools/Creating_Content/Measurement/Computed_Measurement/Script|Add Script]]. |
| − | # Select | + | # Select "SUBMIT" (top right corner) to add the Computed Measurement. |
Revision as of 16:24, 5 July 2021
Contents
Add Computed Measurement
Add Measurement
Adding a Computed Measurement can be broken down into five major steps:
Note: Mandatory fields are marked with an ‘*’. The following steps assume that the user is already logged in to the CMS.
Create New Measurement

- Go to the
 Measurement tab.
 - Select
 ADD NEW. Go to Fill in General Information.
Fill in General Information
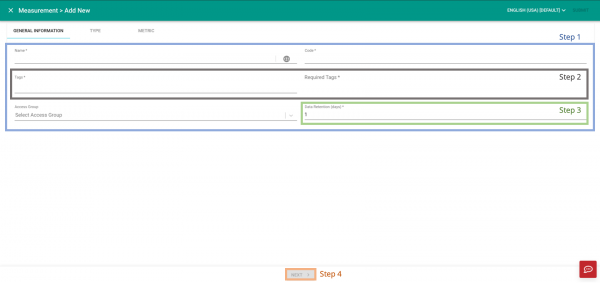
- Fill in the necessary fields (Name, Code, Access Group).
- Fill in the Tags and Required Tags.
- There must at least be one required tag selected.
- Set the Data Retention (days) of the measurement.
- Data Retention (days): Number of days data for the measurement should be stored in the CMS after it has been received.
- Select "NEXT". Go to Choose Measurement Type.
Choose Measurement Type
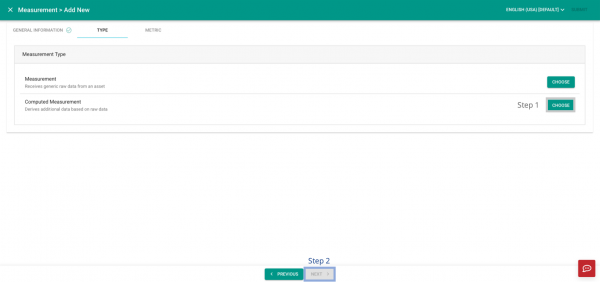
- Choose "Computed Measurement" measurement type.
- Select "NEXT". Go to Add Metric.
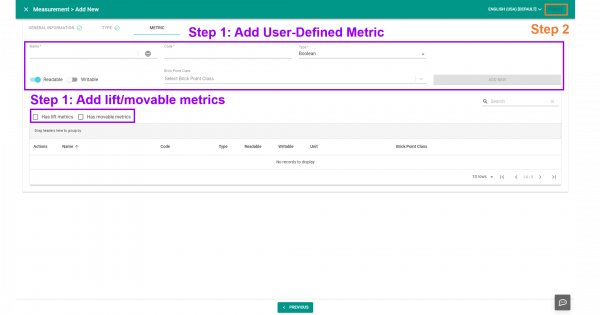
Add Metric
- Add Metric (at least one).
- Lift:
- Check the Has lift metrics box.
- Movable:
- Check the Has movable metrics box.
- User-defined:
- Fill in the Name, Code and Type.
- Set the readability and writability of the Metric.
- Select ADD NEW.
- Go to Add Script.
- Select "SUBMIT" (top right corner) to add the Computed Measurement.