
Difference between revisions of "Adding a site"
From Senfi Docs
(Created page with "=== Pre-requisites === * 3D model with BBL information for '''Bespoke''' type * BBL information for '''User Drawn''' type * 2D floorplan === Model Type === There are two type...") |
|||
| (8 intermediate revisions by 2 users not shown) | |||
| Line 1: | Line 1: | ||
| − | === Pre-requisites === | + | <translate> |
| + | === Pre-requisites === <!--T:1--> | ||
* 3D model with BBL information for '''Bespoke''' type | * 3D model with BBL information for '''Bespoke''' type | ||
* BBL information for '''User Drawn''' type | * BBL information for '''User Drawn''' type | ||
* 2D floorplan | * 2D floorplan | ||
| − | === Model | + | <!--T:2--> |
| − | + | Please read [[Site|this page]] to be familiar with the concepts related to site. | |
| − | + | ||
| − | : | + | === Add New Site with User Drawn Model === <!--T:3--> |
| − | + | # Login to the [https://ems.senfi.io/cms CMS] | |
| − | + | # Go to the '''Site''' tab | |
| + | # Click the '''+''' button | ||
| + | # Fill in the necessary fields (Eg. Site Name, Description, Country, Address, etc...) | ||
| + | # Choose '''User Drawn''' model type | ||
| + | # Add BBL information under '''Building, Block & Level''' section | ||
| + | #* Rename Building (optional) | ||
| + | ## Click '''Edit''' button beside '''Building Name''' | ||
| + | ## Rename Building | ||
| + | ## Click '''SAVE''' | ||
| + | #* Edit Block (Optional) | ||
| + | ## Click '''Edit''' button beside '''Block Name''' | ||
| + | ## Rename Block | ||
| + | ## Update Ground Floor Position (Optional) | ||
| + | ##* The position of the block's ground level base | ||
| + | ##* Default value is 0 | ||
| + | ## Click '''SAVE''' | ||
| + | #* Add Levels | ||
| + | ## You can add individual level or add multiple levels | ||
| + | ##* Add individual Level | ||
| + | ### Click '''+''' button beside '''Block Name''' to add new level under that block | ||
| + | ### Choose the level type | ||
| + | ###* Below Ground: basement level | ||
| + | ###* Above Ground | ||
| + | ### Add Level name | ||
| + | ### Add Height | ||
| + | ### Click '''SAVE''' | ||
| + | ##* Add multiple Levels | ||
| + | ### Click '''+''' button beside '''Block Name''' to add new levels under that block | ||
| + | ### Choose the level type | ||
| + | ###* Below Ground: basement level | ||
| + | ###* Above Ground | ||
| + | ### Add No.of Levels (must be greater than 1) | ||
| + | ### Leave Level name blank (level names can be rename after added) | ||
| + | ### Add Height (All of the levels are using the same height) | ||
| + | ### Click '''SAVE''' | ||
| + | # Navigate to the building location in map (Can use search feature) under '''DRAW FOOTPRINT''' | ||
| + | # Click the '''EDIT''' button to enter edit mode | ||
| + | # Trace building outline by clicking on the map | ||
| + | # Click the '''STOP EDITING''' button to confirm the outline | ||
| + | # Click '''PREVIEW''' tab to preview the 3D building | ||
| + | # Click '''SET DEFAULT VIEW''' button to set the initial view in dashboard (optional) | ||
| + | # Add 2D floorplan for each levels | ||
| + | ## Click floorplan icon button beside edit icon button | ||
| + | ## Select 2D floorplan image file | ||
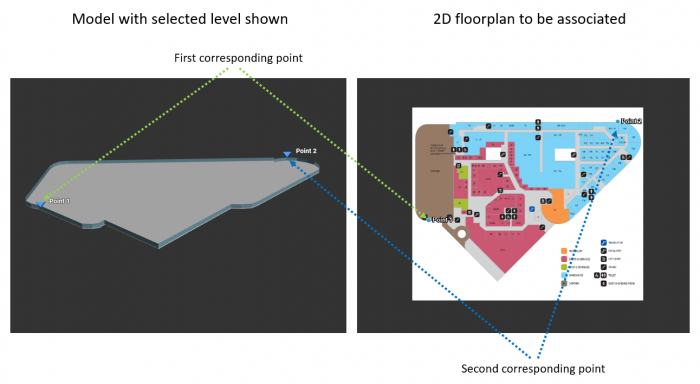
| + | ## Add 3D & 2D reference points[[File:Calibration1.PNG|thumb|700px|center|Add 3D & 2D reference points|link=]] | ||
| + | ## Click '''SAVE''' to save the floorplan | ||
| + | # Click '''SAVE''' | ||
| + | |||
| + | === Add New Site with Bespoke Model === <!--T:4--> | ||
| + | # Login to the [https://ems.senfi.io/cms CMS] | ||
| + | # Go to the '''Site''' tab | ||
| + | # Click the '''+''' button | ||
| + | # Fill in the necessary fields (Eg. Site Name, Description, Country, Address, etc...) | ||
| + | # Choose '''Bespoke''' model type | ||
| + | # Select 3D building model file (zip file) | ||
| + | # Click '''SET DEFAULT VIEW''' button to set the initial view in dashboard | ||
| + | # Add 2D floorplan for each levels | ||
| + | ## Click floorplan icon button beside edit icon button | ||
| + | ## Select 2D floorplan image file (click '''Choose File''') | ||
| + | ## Add 3D & 2D reference points[[File:Calibration1.PNG|thumb|700px|center|Add 3D & 2D reference points|link=]] | ||
| + | ## Click '''SAVE''' to save the floorplan | ||
| + | # Click '''SAVE''' | ||
| + | </translate> | ||
Latest revision as of 10:31, 27 November 2019
Pre-requisites
- 3D model with BBL information for Bespoke type
- BBL information for User Drawn type
- 2D floorplan
Please read this page to be familiar with the concepts related to site.
Add New Site with User Drawn Model
- Login to the CMS
- Go to the Site tab
- Click the + button
- Fill in the necessary fields (Eg. Site Name, Description, Country, Address, etc...)
- Choose User Drawn model type
- Add BBL information under Building, Block & Level section
- Rename Building (optional)
- Click Edit button beside Building Name
- Rename Building
- Click SAVE
- Edit Block (Optional)
- Click Edit button beside Block Name
- Rename Block
- Update Ground Floor Position (Optional)
- The position of the block's ground level base
- Default value is 0
- Click SAVE
- Add Levels
- You can add individual level or add multiple levels
- Add individual Level
- Click + button beside Block Name to add new level under that block
- Choose the level type
- Below Ground: basement level
- Above Ground
- Add Level name
- Add Height
- Click SAVE
- Add multiple Levels
- Click + button beside Block Name to add new levels under that block
- Choose the level type
- Below Ground: basement level
- Above Ground
- Add No.of Levels (must be greater than 1)
- Leave Level name blank (level names can be rename after added)
- Add Height (All of the levels are using the same height)
- Click SAVE
- Navigate to the building location in map (Can use search feature) under DRAW FOOTPRINT
- Click the EDIT button to enter edit mode
- Trace building outline by clicking on the map
- Click the STOP EDITING button to confirm the outline
- Click PREVIEW tab to preview the 3D building
- Click SET DEFAULT VIEW button to set the initial view in dashboard (optional)
- Add 2D floorplan for each levels
- Click floorplan icon button beside edit icon button
- Select 2D floorplan image file
- Add 3D & 2D reference points
- Click SAVE to save the floorplan
- Click SAVE
Add New Site with Bespoke Model
- Login to the CMS
- Go to the Site tab
- Click the + button
- Fill in the necessary fields (Eg. Site Name, Description, Country, Address, etc...)
- Choose Bespoke model type
- Select 3D building model file (zip file)
- Click SET DEFAULT VIEW button to set the initial view in dashboard
- Add 2D floorplan for each levels
- Click floorplan icon button beside edit icon button
- Select 2D floorplan image file (click Choose File)
- Add 3D & 2D reference points
- Click SAVE to save the floorplan
- Click SAVE